Hey,
Beaverdam320 here…This will be my first grow ever. Short background on how I got here is finally convincing my significant other that growing cannabis is a safe, therapeutic and mature way of biding my time. My Christmas gift for this year…resulting in a pack of seeds - Crop Kings: Amnesia Haze, a brick of coco coir, a starter pack of Growth Science Nutrients, and a 5gal. plastic pot. Things escalated quickly from there as this has always been a passion of mine that I have been unable to fulfill due to a plethora of factors. Nevertheless here I am today starting a documented log of my journey at day day 11 (seedling stage) of my first grow.
How it began:
After being gifted the starting items to begin a grow, I started with researching the seed, growing media, and nutrients. I stumbled upon AC Infinity and purchased what essentially is offered as a kit on the AC Infinity website, however this was a custom kit built and ordered thru Amazon. I had a grow space that I wanted to utilize in my office room closet being at 24” x 36”, which AC Infinity offers but not as a standard grow system. So…I assembled it on my own: Cloudlab 632, AC Infinity Ionboard S22, Controller 69 Pro, and Cloudline Pro T4 with carbon filter.
As soon as these items showed up I assembled in my closet and began dry run testing to baseline temperature and humidity within my environment. I then played with the Controller 69 Pro to understand its functionality and automation capabilities within the grow environment/process. The natural environment I have in my household provides a temperature of roughly 60F with a humidity of roughly 35% . Research thus far has lead me to believe that a higher humidity and temperature was optimal for growth within all stages of the process - leading me to pre-order a humidifier from AC Infinity (Cloudforge T3, yet to ship) and a new wifi space heater (Govee Smart Space Heater H7131) from Amazon. What this allowed me to do was raise the temperature in the grow tent and manage humidity. I have thus far resolved temperature. Humidity I am currently using a dome above my seedling and calling that good. Initially I had started with a humidifier that cannot currently be remotely controlled and does not have a humidity setting, rather, an on/off switch. That said I was able to achieve higher and targeted humidity but by using the room outside the tent to pull that in. Having the humidifier directly in the tent and running constantly would be just too much, yet at the same time having it in the room using it as a lung was getting everything else in my office too high in humidity. So…thus the humidity dome, which to be honest is the top to a DairyQueen Blizzard!
Soil was my next issue to address alongside figuring out the best method to germinating a seed. I will get to my germination experience later but for now I will address the growing media. After a long search on various growing methods I settled on soil. To be specific I chose Fox Farms, which as I type this I have learned more about since making that decision and realize this is pretty common amongst beginner growers. That said, no regrets here thus far, going to ride it out and enjoy it. The coco brick my significant other purchased me has been tossed off to the side…for now! Why you may ask? I guess after researching I just decided that being at the experience level I am at and familiarity with growing plants that a soil grow would be best for my first time around. The decision was made with such ease that I can’t actually say I delved into the information deep enough to know whether that brick of coco is of high quality or not, leaning and assuming more towards it being of lower quality or requiring more effort than I am willing to put forth on getting it to a state which I can use it successfully for its intended purpose. So…Fox Farms. I watched a lot of YouTube Videos and came across @420Scene on YouTube. I procured his recipe for Fox Farms: bottom half of pot - strawberry fields mixed with 20% perlite, top half of pot - 50/50 mix of ocean forest and happy frogs.
At a date later in time prior to starting my grow I purchased an oscillating fan: AC Infinity Cloudray S6 to complete my automated setup. Still waiting on the humidifier, expected to ship on March 20.
Germination:
Amidst all of my self educating and information gathering I went ahead and germinated my first seed. First starting in a cup of tap water. The seed floated roughly 36 hours before sinking to the bottom of the cup. At which point I transferred to a paper towel and sealed it in a ziploc bag. First mistake here…sealing the ziploc bag which didn’t allow the bag to breathe. It ended up taking 5 days to observe/get the taproot to .5” which I thought was a bit long.
Side note here…back in college I attempted to grow weed under my desk in my bedroom with a bag seed I procured from consumption. I followed the paper towel method and saw results within 2 days to the point that the taproot was .5” long so I assumed here that was the case for all seeds. This grow didn’t fully propagate, I terminated growth when the plant reached its 4th node due to concern and paranoia about the smell. At which point in time this was illegal where I lived.
Seedling:
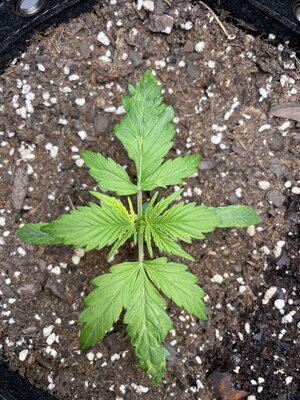
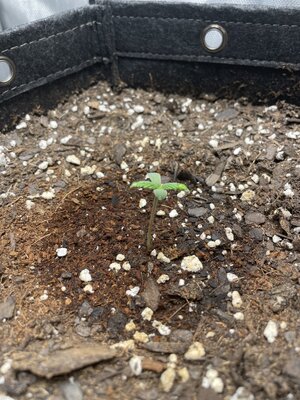
As it sits today I am at day 11 within the grow and I have a seedling. So far…things look healthy. Gut check tells me growth so far in this stage is a bit slow and has me questioning media, watering amount, light cycle and strength, humidity, temperature, etc. It’s so early in the process and I am being exposed to so much new information right now that I am a bit overwhelmed. My seedling I should note is nestled inside a shot glass size of starter potting soil with essentially very little nutritional value. Concept here being that the cotyledons are feeding the seedling at this stage and don’t really need anything additional.
Lighting with my AC Infinity Ionboard S22 has me at 40% power and 1.5’ above the canopy of the plant per the manual. I am running 18/6 and plan to do so throughout the grow. I’ve researched and question at this point what future yields behold me at the end of this journey but am hoping to follow the concept of grams/watt for my first grow to some extent. I don’t yet see my seedling “stretching towards the light” suggesting I don’t need to make a change. Exhaust is at 10% and fan is at 10% oscillating…
Ahead of me:
Next steps for me have me wondering whether or not I should use the liquid nutrients I was gifted. Or should I go the organic route? If so, what do I order? Lots of research has told me that using the KISS method and not over doing it/micro-managing this project is how I should go about it but in the same breadth I don’t want it to be subpar. Leaning towards using what was gifted to me but wondering what else I am missing?
I purchased a pH meter assuming that my tap water was not optimal. Understanding that a pH somewhere between 6-7 is ideal I currently sit at 7.5. Purchased one of each: Apera AI209 and AI314 for testing pH and EC/TDS/PPM. Current assumptions have me targeting a pH level of 6.5 (safe area to be in) after mixing all nutrients if I go the liquid (synthetic) route and feed the plant rather than the soil using the dry amendments method. Also have an air pump to extract chlorine from the tap water in a 5gal bucket 24 hours prior to blending. Then I basically understand that you follow the instructions on the liquid nutrients kit for the stage you are in, don’t go the full dosage for the beginning (planning to start at 25%) and work my way up looking at signs from the plant to tell me whether I need more or less. Starting at the veg stage with that when I start to see signs of nutrient deficiency. Addressing pH after mixing nutrients per spec using General Hydrophonics pH up and pH down. Lastly ahead of me here is how much to water when I start that? Assuming to follow same concept of when the soil is dry and feeding once per week, watering normal for the rest possibly with CalMag added to standard waterings.
Once I start feeding nutrients I have this other tester AI314 to look at EC/TDS/PPM of the runoff in the tray below the pot and use that to determine if I am using too much or too little nutrients during my feedings. I am using an 3gal fabric pot from AC Infinity. And that is about where I stop thus far in my journey! I’ve got to imagine that at some point in this process folks out there reading this will be able to relate and contribute…looking forward to seeing where this forum thread takes me.
Cheers guys, Beaverdam320!
Beaverdam320 here…This will be my first grow ever. Short background on how I got here is finally convincing my significant other that growing cannabis is a safe, therapeutic and mature way of biding my time. My Christmas gift for this year…resulting in a pack of seeds - Crop Kings: Amnesia Haze, a brick of coco coir, a starter pack of Growth Science Nutrients, and a 5gal. plastic pot. Things escalated quickly from there as this has always been a passion of mine that I have been unable to fulfill due to a plethora of factors. Nevertheless here I am today starting a documented log of my journey at day day 11 (seedling stage) of my first grow.
How it began:
After being gifted the starting items to begin a grow, I started with researching the seed, growing media, and nutrients. I stumbled upon AC Infinity and purchased what essentially is offered as a kit on the AC Infinity website, however this was a custom kit built and ordered thru Amazon. I had a grow space that I wanted to utilize in my office room closet being at 24” x 36”, which AC Infinity offers but not as a standard grow system. So…I assembled it on my own: Cloudlab 632, AC Infinity Ionboard S22, Controller 69 Pro, and Cloudline Pro T4 with carbon filter.
As soon as these items showed up I assembled in my closet and began dry run testing to baseline temperature and humidity within my environment. I then played with the Controller 69 Pro to understand its functionality and automation capabilities within the grow environment/process. The natural environment I have in my household provides a temperature of roughly 60F with a humidity of roughly 35% . Research thus far has lead me to believe that a higher humidity and temperature was optimal for growth within all stages of the process - leading me to pre-order a humidifier from AC Infinity (Cloudforge T3, yet to ship) and a new wifi space heater (Govee Smart Space Heater H7131) from Amazon. What this allowed me to do was raise the temperature in the grow tent and manage humidity. I have thus far resolved temperature. Humidity I am currently using a dome above my seedling and calling that good. Initially I had started with a humidifier that cannot currently be remotely controlled and does not have a humidity setting, rather, an on/off switch. That said I was able to achieve higher and targeted humidity but by using the room outside the tent to pull that in. Having the humidifier directly in the tent and running constantly would be just too much, yet at the same time having it in the room using it as a lung was getting everything else in my office too high in humidity. So…thus the humidity dome, which to be honest is the top to a DairyQueen Blizzard!
Soil was my next issue to address alongside figuring out the best method to germinating a seed. I will get to my germination experience later but for now I will address the growing media. After a long search on various growing methods I settled on soil. To be specific I chose Fox Farms, which as I type this I have learned more about since making that decision and realize this is pretty common amongst beginner growers. That said, no regrets here thus far, going to ride it out and enjoy it. The coco brick my significant other purchased me has been tossed off to the side…for now! Why you may ask? I guess after researching I just decided that being at the experience level I am at and familiarity with growing plants that a soil grow would be best for my first time around. The decision was made with such ease that I can’t actually say I delved into the information deep enough to know whether that brick of coco is of high quality or not, leaning and assuming more towards it being of lower quality or requiring more effort than I am willing to put forth on getting it to a state which I can use it successfully for its intended purpose. So…Fox Farms. I watched a lot of YouTube Videos and came across @420Scene on YouTube. I procured his recipe for Fox Farms: bottom half of pot - strawberry fields mixed with 20% perlite, top half of pot - 50/50 mix of ocean forest and happy frogs.
At a date later in time prior to starting my grow I purchased an oscillating fan: AC Infinity Cloudray S6 to complete my automated setup. Still waiting on the humidifier, expected to ship on March 20.
Germination:
Amidst all of my self educating and information gathering I went ahead and germinated my first seed. First starting in a cup of tap water. The seed floated roughly 36 hours before sinking to the bottom of the cup. At which point I transferred to a paper towel and sealed it in a ziploc bag. First mistake here…sealing the ziploc bag which didn’t allow the bag to breathe. It ended up taking 5 days to observe/get the taproot to .5” which I thought was a bit long.
Side note here…back in college I attempted to grow weed under my desk in my bedroom with a bag seed I procured from consumption. I followed the paper towel method and saw results within 2 days to the point that the taproot was .5” long so I assumed here that was the case for all seeds. This grow didn’t fully propagate, I terminated growth when the plant reached its 4th node due to concern and paranoia about the smell. At which point in time this was illegal where I lived.
Seedling:
As it sits today I am at day 11 within the grow and I have a seedling. So far…things look healthy. Gut check tells me growth so far in this stage is a bit slow and has me questioning media, watering amount, light cycle and strength, humidity, temperature, etc. It’s so early in the process and I am being exposed to so much new information right now that I am a bit overwhelmed. My seedling I should note is nestled inside a shot glass size of starter potting soil with essentially very little nutritional value. Concept here being that the cotyledons are feeding the seedling at this stage and don’t really need anything additional.
Lighting with my AC Infinity Ionboard S22 has me at 40% power and 1.5’ above the canopy of the plant per the manual. I am running 18/6 and plan to do so throughout the grow. I’ve researched and question at this point what future yields behold me at the end of this journey but am hoping to follow the concept of grams/watt for my first grow to some extent. I don’t yet see my seedling “stretching towards the light” suggesting I don’t need to make a change. Exhaust is at 10% and fan is at 10% oscillating…
Ahead of me:
Next steps for me have me wondering whether or not I should use the liquid nutrients I was gifted. Or should I go the organic route? If so, what do I order? Lots of research has told me that using the KISS method and not over doing it/micro-managing this project is how I should go about it but in the same breadth I don’t want it to be subpar. Leaning towards using what was gifted to me but wondering what else I am missing?
I purchased a pH meter assuming that my tap water was not optimal. Understanding that a pH somewhere between 6-7 is ideal I currently sit at 7.5. Purchased one of each: Apera AI209 and AI314 for testing pH and EC/TDS/PPM. Current assumptions have me targeting a pH level of 6.5 (safe area to be in) after mixing all nutrients if I go the liquid (synthetic) route and feed the plant rather than the soil using the dry amendments method. Also have an air pump to extract chlorine from the tap water in a 5gal bucket 24 hours prior to blending. Then I basically understand that you follow the instructions on the liquid nutrients kit for the stage you are in, don’t go the full dosage for the beginning (planning to start at 25%) and work my way up looking at signs from the plant to tell me whether I need more or less. Starting at the veg stage with that when I start to see signs of nutrient deficiency. Addressing pH after mixing nutrients per spec using General Hydrophonics pH up and pH down. Lastly ahead of me here is how much to water when I start that? Assuming to follow same concept of when the soil is dry and feeding once per week, watering normal for the rest possibly with CalMag added to standard waterings.
Once I start feeding nutrients I have this other tester AI314 to look at EC/TDS/PPM of the runoff in the tray below the pot and use that to determine if I am using too much or too little nutrients during my feedings. I am using an 3gal fabric pot from AC Infinity. And that is about where I stop thus far in my journey! I’ve got to imagine that at some point in this process folks out there reading this will be able to relate and contribute…looking forward to seeing where this forum thread takes me.
Cheers guys, Beaverdam320!
 Welcome to AFN