Indoor AUTO COCOPOPO

Joined
Mar 18, 2017
Messages
28
Reputation
0
Reaction score
18
Points
0
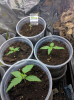
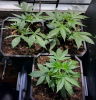
I started 3 auto Cocopopo seeds on February 10th. I soaked them in 1/2 inch of water in a very warm place on the top of the fluorescent fixture. They opened up very fast and the roots popped right out in a couple of days. I planted them in 1 litre containers with cactus soil in the bottom and seed starting mix on the top 2 1/2 inch. I then put them back on top of the light in a very warm place. Sativa seeds need to be warm to start well, even above 30c. A couple of days later they were up and looked very strong and healthy. I was very happy.

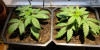
The goal was to add them to my seed collection by crossing them with one of my homemade 6th generation auto sativas.I started growing autoflowers when they first came out but everything was mostly indica so I decided to make my own auto sativas. I have many many varieties of photoperiod seeds after growing for decades. As they came out with auto sativas I crossed them in and now have fabulous autosativas mostly thai but adding in mexican, columbian, burmese pure and I can't really remember. So I was planning to make seeds from the auto Cocopopo. They sounded so good and the reviews of the chocolope sound very good. Autofems are good but I prefer starting seeds that cost me nothing.
 
Here is a photo of the Cocopopo two weeks after I started them as well as one auto Kali Mist. The seeds were pretty stable and even though one was a bit slower it ended up catching up to the other two eventually.
 

Attachments

  • IMG_20170216_204316.png
    IMG_20170216_204316.png
    910.2 KB · Views: 201
On day 17 I repotted them from the one litre containers into three gallon pots. They sagged their leaves down a bit but the next day they strightened right up and started to grow very quickly from there on. If you notice, the one on the left has variegted leves with just a bit of cream coloured edges. Old school knowledge says that this is a thai trait, so I was actually glad to see that. Chocolate thai, here we come.
 

Attachments

  • IMG_20170227_075107.png
    IMG_20170227_075107.png
    819 KB · Views: 175
The next day, the third seedling had been repotted and you can see that it has almost caught up in size to the other two. I really like these plants. They are fast and strong.
 

Attachments

  • IMG_20170228_180548.png
    IMG_20170228_180548.png
    1.6 MB · Views: 172
The same day this photo of the side view on day 18 shows that the one on the left has jumped up about two inches and lifted up all it's leaves. It's also tilting itself into the light.
 

Attachments

  • IMG_20170228_204043.png
    IMG_20170228_204043.png
    1.4 MB · Views: 144
Well, these are not my best lights but I am using this space because it is taller than where my led pannel is. I used cool white 6000k spiral flouros for the first stage as well as led bulbs 6000k. The plants grow well there and it is upstairs so it is nice and warm.

The place where these were re potted I am using led spot lights daylight 120w equivalent. You will see in some of the later photos that the lights penetrate right down through the plants to the soil. The plants seem to grow well there and it is in front of a great window that is west by slightly south. The sun comes in right to the back of the room and the window is tall. The sun has started to strenghten now and the plants seem happy there.

The goal is not to get the best quality but to get seeds for my outdoor summer crop.
 
On day 20 you can see the plants are really starting to move and because of the change to redder light the one on the left is starting to stretch a bit.
 

Attachments

  • IMG_20170302_162055.png
    IMG_20170302_162055.png
    1 MB · Views: 194
By day 25 you can see the cocopopo have really stretched up a lot higher. They seem sturdy and strong and are starting to look very sativa. The new leaves are looking more narrow as well.
 

Attachments

  • IMG_20170307_051342.png
    IMG_20170307_051342.png
    739.9 KB · Views: 251
Back
Top