What's up AFN? I was inspired by @Son of Hobbes' "Operation Compassion Care" thread, to post a tutorial, "Dollar Tree Meets Wally World: Grow Meds On The Cheap". I've been thinking of what the next step is for a new grower after they complete their first grow . For most new growers, the answer is to buy new seeds, which can be very costly. Cloning is a priceless skill to acquire. It may seem to be a very technical application of growing, and maybe it is, but it doesn't have to be an intimidating process. I am going to put up a "bare bones" tutorial on how to do it on the easy, and on the cheap. I am going to do it as one consecutive post, so let's get stared! 
Tools Needed
Alcohol
Scissors/Shears
Box Cutter/Blade
Permanent Marker
Duct Tape (optional)
Humidity Dome (d-i-y or cheap)
Small Plastic Cups/Containers (22 for $1)
Spray Bottle (rain or tap water ph'd 5.8-6.0)
Vermicompost (worm poop) Large bag $15
Cheap Potting Soil (light and airy w/perlite if available average $5)
Sandwich Sized Plastic "Tupper Ware" type container (3 pack for, you guessed it......$1)

Making Your Containers
I use "Red Solo Cup" mini shot glass style cups for seedlings and clones, if I am trying to force root formation in a hurry, to up-pot as soon as possible, otherwise I use 1ltr Dollar Tree d-i-y air pots or 20oz Solos. For this tutorial, I will base everything on the 2oz mini solos.
Take box cutter and make drain hole in bottom of cup.


At this point you write the strain info and cloning on duct tape and place it on solo cup, in order to reuse cup. If you plan on discarding cups after use, write info directly on cup.
I originally forgot to put this in the tutorial, but the reason I choose mini plastic cups is because they allow the medium to dry out faster, and that is what you want, especially with clones.You want to encourage the new roots to search for food/water, which in turn causes the root system to rapidly expand, and an expanding root system means an expanding plant. If you keep the media too moist, and all the food right there for the taking, the roots don't have to search for anything, and the growth will be slower. That is the simple take on it. If you want to maximize plant size, the wet/dry cycle in veg is key.
Mix Potting Soil
I mix 1/2 potting soil, then 1/4 worm castings in cup using a wooden skewer and give a light stir. Then top off with potting soil, and sit it in Tupperware container. Pour aprox.1/2" ph'd water in bottom of Tupperware, and allow potting mix to soak up water until soil is saturated; usually 3-5 minutes. Add 1/2" of water to Tupperware each time you add a new clone.

While the soil is soaking, take your shears and take your cuttings.
Selecting Your Clone
Try To find clones with 4-5 nodes (stacked leaf sets), with a relatively rubbery, pliable texture. They root faster than woody stems. Cut the stem at a 45° angle. Once you cut your clones, place them in a cup of ph'd water until you are ready to put them in soil. I have successfully done this without ph adjustments many times, but if you have a meter, adjust the water.


Planting Your Clones
Take cups out and push down on soil lightly to remove excess moisture; leave the mix very damp but not dripping wet.
Make a hole in center of soil (I use an ink pen), and gently insert clone.
Gently press dirt around hole until clone stands firmly on it's own.


 Some people cut leaf tips to inhibit the clone from trying to grow leaves, and to focus the energy on root production. I do think that this helps, but I usually get roots in 7-10 days either way, though some strains are harder to clone than others.
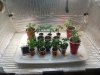
Now you are ready to place them in their dome. Mist clones right away. Make sure to mist 3 times a day for the first 2-3 days. Day 3, start to crack open your dome (1/8-1/4 of the way, if dome has vents) to let just a bit of air in. If no vents, just prop ends of dome open with whatever small thing you can find. I've used Legos, empty Chap Stick dispensers, a few quarters stacked up etc. If you see that after the first few hours the clones start to wilt, close dome completely and try again in 24 hours; repeat. You will end up with a clones that looks similar to this...


Honorable mention:
This was my first cab. A hotel was being renovated, and they had put these small closets out as trash, so FREE! I already had a 4" hole saw to make openings, bought a few clip lights and cfls and started some local badseeds that I had from something they were calling "Killer Skunk". I spent the most on the reflective insulation. ($30)
Tools Needed
Alcohol
Scissors/Shears
Box Cutter/Blade
Permanent Marker
Duct Tape (optional)
Humidity Dome (d-i-y or cheap)
Small Plastic Cups/Containers (22 for $1)
Spray Bottle (rain or tap water ph'd 5.8-6.0)
Vermicompost (worm poop) Large bag $15
Cheap Potting Soil (light and airy w/perlite if available average $5)
Sandwich Sized Plastic "Tupper Ware" type container (3 pack for, you guessed it......$1)
Making Your Containers
I use "Red Solo Cup" mini shot glass style cups for seedlings and clones, if I am trying to force root formation in a hurry, to up-pot as soon as possible, otherwise I use 1ltr Dollar Tree d-i-y air pots or 20oz Solos. For this tutorial, I will base everything on the 2oz mini solos.
Take box cutter and make drain hole in bottom of cup.
At this point you write the strain info and cloning on duct tape and place it on solo cup, in order to reuse cup. If you plan on discarding cups after use, write info directly on cup.
I originally forgot to put this in the tutorial, but the reason I choose mini plastic cups is because they allow the medium to dry out faster, and that is what you want, especially with clones.You want to encourage the new roots to search for food/water, which in turn causes the root system to rapidly expand, and an expanding root system means an expanding plant. If you keep the media too moist, and all the food right there for the taking, the roots don't have to search for anything, and the growth will be slower. That is the simple take on it. If you want to maximize plant size, the wet/dry cycle in veg is key.
Mix Potting Soil
I mix 1/2 potting soil, then 1/4 worm castings in cup using a wooden skewer and give a light stir. Then top off with potting soil, and sit it in Tupperware container. Pour aprox.1/2" ph'd water in bottom of Tupperware, and allow potting mix to soak up water until soil is saturated; usually 3-5 minutes. Add 1/2" of water to Tupperware each time you add a new clone.
While the soil is soaking, take your shears and take your cuttings.
Selecting Your Clone
Try To find clones with 4-5 nodes (stacked leaf sets), with a relatively rubbery, pliable texture. They root faster than woody stems. Cut the stem at a 45° angle. Once you cut your clones, place them in a cup of ph'd water until you are ready to put them in soil. I have successfully done this without ph adjustments many times, but if you have a meter, adjust the water.
Planting Your Clones
Take cups out and push down on soil lightly to remove excess moisture; leave the mix very damp but not dripping wet.
Make a hole in center of soil (I use an ink pen), and gently insert clone.
Gently press dirt around hole until clone stands firmly on it's own.
Now you are ready to place them in their dome. Mist clones right away. Make sure to mist 3 times a day for the first 2-3 days. Day 3, start to crack open your dome (1/8-1/4 of the way, if dome has vents) to let just a bit of air in. If no vents, just prop ends of dome open with whatever small thing you can find. I've used Legos, empty Chap Stick dispensers, a few quarters stacked up etc. If you see that after the first few hours the clones start to wilt, close dome completely and try again in 24 hours; repeat. You will end up with a clones that looks similar to this...
Honorable mention:
This was my first cab. A hotel was being renovated, and they had put these small closets out as trash, so FREE! I already had a 4" hole saw to make openings, bought a few clip lights and cfls and started some local badseeds that I had from something they were calling "Killer Skunk". I spent the most on the reflective insulation. ($30)
Attachments

Last edited:

