Harvesting, Drying and Curing: A Guide to Finishing Quality Bud
Harvesting: One trichome at a time
The time to chop is getting near....but when exactly is that? Trichome gland colour should be the final observation when the perfect time to harvest is, but pistil colour is also a good way to see the final stage of a plant's life coming to a glorious end.
Pistils and early detection of maturity :
Some guys think that going by pistil(aka stigma aka "hairs") colour is a mistake, but I use pistil colour long before I need to grab a tool to be able to view trichome colour up close. I don't even bother looking at the trichomes, until I see 90% coloured pistils. What I think is the perfect harvest point, is when I see the upper colas have mostly all cloudy trichomes with 10-20% amber trichomes. Harvesting during this point, ensures that I get both maximum yield, and maximum potency before the trichome heads start to degrade.
Pistils and their possible deception :
One important thing to point out when using pistils as a warning sign... They can deceive you if you are not careful!! If you are a "hands on" grower, and like to constantly handle and squeeze your flowers every bud that is handled in this way will have damaged trichomes(which can fake you out thinking they are amber naturally), and they will also affect the pistil colour, faking you out thinking they are withering, due to the colour change. Torrential rain storms, and cold weather, especially prolonged cold temperatures, also usually have this effect on Pistils.
Also, some strains goes through waves of flowering maturity. I have had plants that I could have sworn were finished, going by the Pistil colour (95% coloured), only to check under the Jeweler's Loupe to see 50% cloudy with 50% clear trichomes. A day later, 10% of White Pistils started to spring out. Another 2 days after that, and the plant was back to 30% White Pistils, and that plant went for almost another 2 weeks before she was harvested with a nice 10-20% amber trichomes.
Pistil colour is a fine way to know when to check trichome colour, but it should not be used as a solo means for harvesting a plant.
Trichome Colour and Effect :
There is quite varied effect possible harvesting at different times. Visual identification of trichome colour should be done on various parts of the plant, and ideally it should be done on the Calyx(aka empty seed pods).
Clear Trichomes - Clear trichomes often produce more of an up high effect, even with Indica dominant strains, though sometimes it can be a jittery type of buzz that many folks don't find enjoyable. This effect is also referred to as a "racy" high. Some people like the more energetic uphigh effect of a clear trichome harvest, so if you aren't sure, then take at least a couple of buds early on and see what you prefer. It might set the pace for harvest times for you on future grows.
"Clear trichome, around 50% clear and 50% cloudy trichomes on this plant"

Amber Trichomes - "Generally" amber trichomes tend to carry a lethargic couch lock or sleep inducing narcotic stone, when it can feel like it takes every bit of energy you can muster to simply sit up, and grab a drink or a snack that seem so distant at 2 feet away.
"Hyper Ryder SPG with 70% Cloudy and 30% Amber Trichomes"

Cloudy Trichomes - The most balanced of the three types of trichome types is the cloudy or "milky" trichome stage of maturity. This is the stage trichomes go through, after the clear stage, before they turn to the Amber colour, which is a trichomes final stage before they begin to degrade and potency drops below its peak performance. This is the stage you want to harvest plants. I prefer a mostly cloudy trichome with 10-20% amber trichomes. There will be some clear trichomes present if you take a whole plant at once, and they will be concentrated on lower buds that don't get as much light as upper buds, which lead to the next part, the selective harvest.
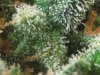
"Toofless Alien with 95% Cloudy Trichomes, and 5% Amber Trichomes"

Selective Harvesting : Maximizing yield and effect - This is really a great way to increase yields and effect from lower, often under formed buds. When you go to harvest your plant, you will see a big difference between the buds that are in the top light and the ones that lived their lives in less desirable light. Indoors or outdoors, you will see this variance. You will also see a difference in trichome colour on lower buds, which they are often a clear cloudy mix , when the upper buds are cloudy with some amber. I cut the colas off at the point, where I see the density dropping to the point where i would ask myself "Hmmm is this even worth trimming?"
Taking the top buds in one stage, and then leaving the lower buds to finish up for another 7-14 days will result in a much better harvest, and you will find that much of the under formed bud that would not be worth the effort trimming will indeed become bud that is worth trimming. On outdoor photoperiod plants, I have increased bud that is "trim worthy", resulting in an increase as much as 25% of the total plant yield. Worth doing for sure!! As this technique can be high stress(cutting all of the branches in half in a single day), always make sure you look at your remaining plant close watching for stress induced hermaphroditic traits to appear. If you see some appear, either observe closely and pinch the male pollen sacs as they appear(if its only a few here and there), or simply make the call to cut the plant.
In my opinion, Selective Harvesting is one of the best methods indoors or out to increase your yields on any plant or strain. Only an extremely small percentage of plants I have tried this on, had only a minimal positive impact on yield. If you have the time and space, this is highly recommended.
Trichome observation tools of the trade :
There is three tools that can be used to view your trichomes. One is a Jeweler's Loupe. These are super cheap to buy on ebay or amazon. I bought a 60-100X led battery backlight powered unit for $6 with free shipping, and it works well enough.
The second tool, is a USB microscope. I have a fancy one of these microscopes (nearly $100), but I found the learning curve to be very frustrating. If this is what you want, make sure to do some research, and find one that is easy to use. They have USB microscopes that go way beyond the magnification needed to view trichomes. Don't overspend by getting one that goes way beyond magnification for what you are wanting to use it for!
The other tool for viewing trichomes up close is a macro lens for a digital camera, or a macro app for a smart phone. If you are seeking a decent camera, understand that it does not have to break the bank. I have been running a Canon SD790IS with digital macro mode, and get this....you can buy one new for around $80 on ebay, or you can get one used for a measly $40. Its a very reliable camera, and takes excellent macro shots. Grab a cheap, flex tripod for $10, along with a decent SD card for another $10, and you are totally set.
The Art of drying your Bud :
No matter how well you have grown your buds, if you mess up the drying and curing stage, all that hard work growing the buds perfectly can be lost, or at least smell, taste, and potency will be diminished to at least some degree. Proper drying and curing, is a key component in getting the highest potency, tastiest, and stinkiest buds possible.
Getting the perfect drying environment can be very challenging, and in some cases, it is impossible without the addition of climate controlling devices such as Dehumidifiers, Heaters, Humidifiers, Air conditioning units, and Evaporative Coolers. Take it as far as you want, depending on your resources and situation, and your needs or desires.
The ideal climate for drying - If you are fortunate to have a fully climate controlled drying space, awesome you lucky devil! Ideally, you would have an area that is dark(certainly no daylight/sun) and is 45-55% Relative Humidity, with 60-70F(15-21C) temperature, along with a gentle breeze. Fresh air should be circulated into the drying area.
Many even most growers will not have a perfect climate controlled drying area to dry in, so we have to work around different challenges. Let's take a minute, and talk about climate adversity, and I do have a few extremes extremes to deal with!! In the fall after I harvest my outdoor, relative humidity percentage (referring to this as RH % from now on) is very high due to the changing of seasons from fall into winter. Tons of rain means relative humidity in my outbuilding sticks around 70% with Dehumidifiers running...ouch!! VERY far from ideal!
Working in Cold, Damp conditions:
Temps are also cool at this time of the year, and I often find myself chattering my teeth, as I am trimming my final plants in the unheated outbuilding(5-10C/41-50F). This is a very difficult situation to dry in. How exactly do we dry our bud to a perfect 62% when the humidity is 70% in the drying room?? The short answer is you don't, it simply doesn't dry properly, and if the air is stagnant you will face the bud curer's worst fear, the dreaded mold.
I have dried in this environment for many years and it can certainly be done, and you can still pull a high quality toke. I have done full branch hanging, defoliated leaf branch hanging, large paper bags on wire racks, and all without mold forming....as long as you have a nice gentle breeze blowing across buds for the hanging methods, or strong circulation from an oscillating fan for paper bag drying, I find mold to be a non issue.
I am fortunate to have a secondary drying space, which is the inside of a 100 year old cabinet, and for some reason the humidity is always much drier than the rest of the house in the damp autumn. It is usually a nice 50% RH, which give me a good space to final dry the buds in boxes until they reach a nice 65% Rh in the jar. More on jar curing in the later part of this guide.
Those is super high Relative Humidity trying to dry, might find it necessary to set up a small room, or a tent with a dehumidifier, to be able to get their bud ready for the jars. Drying in 80% RH+ is a pain in the butt!!
Working in Hot, Humid Conditions:
Our area in the mid summer (late June- mid august) is hot...sometimes a scorcher!! This is another tough climate to deal with. Excessive heat destroys fragile Cannabinoids, and also degenerates precious Terpenes resulting in a reduced scent.
Coupled with our very high humidity (60% minimum to 70% being usual) that we deal with when its brutally hot(close proximity to very large inland lakes means very high humidity when its super hot), makes this an extremely difficult climate to dry in. Out of necessity, I have dried in a heat wave in a small outbuilding before, and lots/most of the smell is certainly lost during the drying process.
Some varieties seem to hold their scents better than others when dried in a heat wave, but i would say all varieties that were dried in the heat seemed to have lost a fair bit of smell to some degree. Fortunately on the long cure, several of the varieties had noticeable increases of scent return after a few weeks to months of curing.
Different drying methods :
Whole Plant Hang - This is pretty much as old school as it comes. Ideally plants will be chopped and hung upside down, ideally with an oscillating fan lightly blowing across the plants. The duration of the time needed will be extremely varied depending on plant size, relative humidity, temperature, bud density, and circulation.
"Kosher Kush broken down into main branches and hung with fan leaves on"

Defoliated Fan Hang - Modified full plant hanging. For those in more humid areas this will help speed the drying process a bit, by allowing more circulation to the buds. Take the plant and remove all leaves with an exposed stalk, and then proceed to hang it upside down.
Wet Trimmed Hang - A few reasons to do wet trimming....you can trim far more in a day we then you can after it starts to dry out a bit. In a very humid drying environment, wet trim will certain help decrease dry times and also decrease chances of getting mold. The further you break the bud down to smaller branches the faster it will dry.
"Wet trimmed Hang G-13 broken down to 16"/40cm colas"

Inverted Wet Trim- This is a good way to semi speed dry some samples, without sacrificing too much quality. Grab a large cardboard box. Fold the flaps in and poke a bunch of holes with a screwdriver around 4" apart. Grab a bunch of smaller branches with some decent bud on it and trim them to finish. Put in fairly close proximity to a fan. If you are in a real hurry or are in really high humidity, cut the bottom out of the box and put it on top of a running dehumidifier for a more rapid dry time. I like to do this method to quickly test a few buds when i harvest a variety so I can get an early taste a couple of days before the rest is ready.
Paper bag/Box dry - In my opinion, this is the best method for getting top smell and flavour, but it comes with a higher risk of mold, especially for those in high RH, or those with a lack of circulation. I use large yard waste paper bags (double walled) for this. Final trim (fresh wet trim) into golf ball sized place evenly spaced with a 1/2" of more in between the buds. In humid climates leave the bag open and have circulation from a fan blowing across the open end of the bag. In dry climates, close the bag and use the fan blow a fan across it. Check every 24 hours. After an initial 24 hours passes, go through and flip the larger buds to promote even drying. Dry until a stalk barely snaps instead of folding over.
Those in drier RH climates are at a far less chance of mold forming, but I do believe that circulation across the bags is essential for this type of drying. Those drying smaller quantities, have had great success using single walled paper "lunch sack" bags kept completely closed for several days.
"Some Durban Poison Buds in a bag, after being wet trimmed"

Oh no! Overdried bud!
Don't panic!! This is not the end of the world by any means, and though it might seem like you are screwed, you are not. If your bud is 55% RH in the jars (also known as "duster" pot), there is a way to fix it. If you have a fairly fresh bud of another variety(do not use a totally fresh cut bud, better to use one that has dried a couple of days that would be in the 85%RH range), that is not completely dry(68-70%RH) then it a super easy fix. Simply take a fresh bud and throw it into the jar with the over dried bud and leave it in there for 12 hours and then allow to breath every 12 hrous while closely monitoring the hygrometer. Then remove the hydration bud, and leave the hygrometer in the jar for 6-8 hours and repeat the process if needed. The moisture from the bud that is not fully dry, will be sucked out and dispersed into the over dried buds. Some growers have used lettuce, orange and potato peels, to do the same thing. Make sure you remember to remove your hydration item(be it a fresh bud, or vegetable) when they have accomplished the ultimate goal of re-hydration!
REHYDRATION CAUTION: If you don't(or fail to vent properly), you can have white surface mold form within a couple of days.
Some guys also use Boveda 62% packs for this purpose as well. Boveda climate control packs are a unique item, which was originally made for storing expensive cigars and keeping the relative humidity of the sealed container right at 62%. Boveda also has other % climate control packs available for those that like a slightly damper, or drier bud. I am not an expert on re-hydration, I have done it a couple of times, but its extremely rare that I overdry any bud, so I just haven't got to use these techniques very often, including boveda climate control packs.
Trimming methods 101 -
One of two trimming methods will be used, depending which drying process you will use, will determine what trimming process will be used.
Method 1 "Wet Fresh Trim" - This trimming method will give you absolutely beautifully trimmed buds. Trimming, while the leaves are still springy and full of life(up to 24 hours after the cut), is very productive, and finished buds are very clean when done right. First, take a nice cola of 1 foot or so in length. Go through the entire cola and break off all of the fan leaves with no visible trichomes. I take pretty much every leaf with a visible leaf stalk and little to no visible trichomes. Discard the fan leaves. Now, working from the bottom of the branch to the top use a pair of fine tipped scissors, and cut off the leaves with visible trichomes into a box. These leaves will be kept for hash or edibles.
Depending on your drying method, either cut the buds off the stalk(if you are paper bag drying), or trim the cola as best as you can if you are defoliating fan hang drying. If you are doing a full wet trim, then continue on, and finish trimming the buds removing virtually all leaf, and leaving only beautiful flower behind.
Extending the wet trim duration - treat 'em like flowers!
If you have ever solo trimmed a huge plant, you will know that it is impossible to wet trim a monster by yourself in a single day. You can get so much more trimmed in a day when its first cut fresh. Day 2 the trimming goes okay, but what you can do in a day drops, and by day 3 after the cut, it turns into a trimmers nightmare, until its nearly dry. This is something I messed around with last year, and wow does it work!! When I first chopped the plant I cut the branches into manageable sized stalks (4 foot branches) I took a bunch of 5 gallon pail and filled them with 4" of water. Thinner branches, I tied together with some plastic coated wire in bunches of 6-8 branches. Put the branches in the water and they will stay fresh cut perfect for at least an additional 24 hours. After 72 hours they are a bit wilting, but the difference is amazing.
Now the negative with this technique...it will vary your drying time by quite a bit, especially if you are pushing into 3 days after chopping.
Method 2 "Dry Trimming" -
Arggghhhh the dry trim. If you have ever tried to dry trim a monster plant, you know why I am so unhappy with this method! You have to have large containers that you can shut airtight, or your stash will dry out on you, before the task is done. I find dry trimming the most tedious method of trimming. The process is simple. Let your bud dry out (either fan leaves removed or intact depending on which method you are using), until there is just enough moisture left in them when you take a bigger bud and bend the stalk it barely breaks instead of bends.
Try out dry and wet trimming, and let me know what you think!
Method 3 "Machinery : Welcome to the age of industry"
The Wet trimmer - I did a lot of research on various power and manual trimmers, and the selection and effectiveness from what I saw on these machines is nearly as vast as their differences in cost. Some wet trimmers can be bought for as low as $100 (manual bowl trimmers, or do it yourself blade trimmers similar to trim pro), but reviews are very mixed on these products, and they sure do seem to damage a lot of trichomes, or don't get a very close trim! Upward in price from there, there is many different options in various wet trimmers, all the way up to machines that cost $20,000 and even more for the large complicated commercial machines.
The Dry Trimmer - Again, I did quite a lot of research on these machines, and from what I have seen the dry trimmers do a better job, and are gentler on trichomes than wet trimming machines. There seems to be a more varied selection of wet trimmers available than dry trimmers. Dry trimmers can be fairly valuable units, ranging from about $400 to $2000 for larger commercial units. A certain environment is needed for dry trimmers to work properly. If you try to run these machines in 60-70% relative humidity, the outer leaves that you want the machine to break off won't crisp up enough, and the machine will not work properly.
I recently received a Toms Tumble Trimmer 1900 series trimmer to try out this fall. From the reviews I have watched, I am very excited to see this machine in action!! Toms Tumble Trimmer 1900 can trim about 80-85% of the leaf, which is a HUGE saving in time versus normal trimming, and it can do a large amount of product in a short time. The TTT 1900 should be able to 80-85% trim 2-3 pounds of dry bud in less than 10 minutes. Very impressive indeed!! After the autumn harvest happens this season, I will update this section.
Tools of the trade -
Dehumidifier - Those with humid drying spaces will find a dehumidifier very valuable. The smaller the space the easier it will be for the dehumidifier to decrease the moisture in the air. In the worst humidity I find it useful to run the dehumidifier in front of an oscillating fan to spread the dry air coming out of the Dehumidifer.
Humidifier - Those in hot, arid climates will find use in humidifiers, but to be honest unless you have a whack of weed to dry, drying in double walled paper bags, will slow the drying process enough to give a decent drying process.
Air conditioner - You will only need one if these if you live in a hot, humid climate. If your drying space is over 70F (21C), some of the more volatile terpenes will start to disappear. If you get 80F (26C) drying speed will increase resulting in a harsh toke, and terpenes will really start to get lost. If your drying space is hitting temps of 90F (32C) or higher, and you will lose lots of your fantastic smells and taste. High temperatures I believe, is the largest key factor involved in getting a diminished scent and taste.
Heater - Man, I hope you don't ever need one of these in your drying space!! Personally, I don't see a big deal with low temperatures, as long as the temps aren't getting to freezing point, and turning your half wet buds into budcicles!! I would rather a slow drying process than a fast one for sure!! If you are in a rush to get some dry weed and conditions are cold, consider adding a heater, but be careful! Heaters can often start fires, and you should be cautious using one. I use one, but not for increasing the room temperature, instead I use it so I don't freeze my ass off while trimming the last plants of the season!!
Evaporative Cooler - This seems to be the ultimate solution for those is super low humidity arid areas. These units will increase RH% while simultaneously decreasing temperature. Very useful indeed for those in hot and dry climates. They don't seem very expensive either in the $150 range for one that does 500 square feet.
Oscillating Fan - This is a necessity in the drying process, especially in humid climates. One of the tall stand up models with multiple settings is ideal. Always use a fan on rotating(oscillating) mode, as you don't really want it to constantly blow in one section of hanging plants of bags of buds, instead its better to move the air every 10-15 seconds or so.
Thermometer/Hygrometer - These are key in both the drying and curing process. Feel free to buy a bunch of small, cheap hygrometers. Some will be inaccurate, which is totally fine. If you have a bunch of extra money to burn, then feel free to spend $20 or more per hygrometer for one that can be calibrated, but for me I am content with the small cheap $1.50 units imported from china. They are generally close enough to accurate, and using the test below, the variance is easily kept track of.
When you get a bunch of jar hygrometers, the first thing to do is set them all up side by side. If you bought more than two or 3 there will almost certainly be a difference in the RH% readings. Now, do this test below to find out which ones (if any) are totally accurate. The units that are not accurate, take a small sticker and write the variance on it, and stick it to the side of the hygrometer so you know what the real humidity is(for instance the hygrometer might read 4% higher than 75% when you do the salt test below, which you then know the unit reads 4% higher than it should, so in the jar you would want it to read 66% instead of 62%).
Calibrating Hygrometers : The salt test
When salt and water are in a saturated solution at equilibrium, the resulting humidity is 75%. This gives an excellent reference point to calibrate hygrometers.
Components needed:
Ziploc bag or airtight sealable container
Pop or Beer Bottle Cap (or other small container)
Small amount of salt (regular table salt)
Water
Hygrometer(s)
Salt Test Procedure :
1 - Place the salt in the bottle cap (or other small container).
2 - Dampen the salt with water. Do not put so much in that the salt gets "sloppy". You want a well dampened pile of salt in the bottle cap, not a soupy pile.
3 - Place both the hygrometer and the bottle cap full of damp salt in the ziploc bag and seal it well. It is important not to let air in or out for this test to work properly.
4 - Keep it like this for 8 hours.
5 - After 8 hours in the damp salt environment, the actual humidity inside the bag will be 75%. Compare it to your hygrometer, your hygrometer should also read 75%.
6 - If your hygrometer is not showing 75%RH, you will then know exactly how far off your hygrometer is. If it is not accurate, note the amount and direction that it actually reads and be sure to add or subtract that amount when reading the hygrometer. If the hygrometer has a control to adjust it, you can set the hygrometer to 75% directly after the test.
Different methods of drying in different adverse climates.
Hot and dry - This is likely the hardest climate to dry in to get really high quality smell and flavour. Heat and light destroy terpenes quicker than anything else, and dry relative humidity speed dries the bud too quickly, which can often result in a harsh toke.
- Slow down the process by doing a full plant hanging with fan leaves intact.
- Slow down the drying process by leaving buds on thicker branches and dry in paper bags.
- Get an Evaporative Cooler. It seems to be the ultimate solution for folks with hot and dry climatic challenges to overcome.
Cool and Damp - Circulation is key to success here. Several methods of drying can be used in humid, cool climate, but know that every drying method that slows down the process, comes with a greater risk of mold forming. For this reason the trimmed wet hanging technique is most recommended, or defoliated hanging technique. Constant monitoring of the buds is essential. Using a Dehumidifier is also recommended, it will take some of the moisture out of the air and also add some warm dry air. Running an Oscillating Fan to blow the drier stream of air coming out of the top of the Dehumidifer across the buds will aid in the process of drying.
- Use the wet trim method to speed the drying process.
- Speed the drying process with the combined use of a fan and dehumidifier.
"Trimmed wet wall of buds from a single Frisian Dew plant"

Jar Curing - The time has come. Your buds are dry enough to put into jars! I feel buds are ready to put into jars when I grab a larger sized bud and try to bend the main stalk over and instead of it folding over it barely breaks instead. As you go to put the buds into the jar Make Sure you inspect the buds closely for any mold. Putting moldy bud in the jar can spread and ruin whole jars of bud.
I find after 12 hours in the jars, bud that had stalks that barely snapped instead of folded will be around 65%-68% relative humidity. What just happened? The buds felt dry when they went in the jar, and now they feel spongy and damp? The consistent environment of the jar has drawn the moisture out of the inner stalks, and dispersed it evenly through the contents of the jar. This will accomplish two things. It will draw moisture out of the biggest buds with thick stalks, and it will also rehydrate the small buds with thin stalks that may have been slightly over dried, while waiting for the larger buds to dry out enough for the stems to snap instead of fold. If the Hygrometer reads 70%RH or higher, after 12 hours of being in the jar, then remove the buds from the jar, and spread them out in a paper bag or box, and dry for 6 hours, then repeat the process.
If you are reading at 68%RH or lower after 12 hours, then you are ready for the rest of the curing procedure. Open your jars for one hour each day, and then close your jars back up for another 12 hours...repeat this procedure until your jars read 62%RH after 12 hours with the lid closed tight.
Speed Curing : For those short on time
There i was....my weed was dry but not quite dry enough, reading 68% and I was destined to go fishing for a week, in just a couple of days...arghh. I needed this weed to dry out, but i didn't want to sacrifice too much quality, so I devised a special instrument for this purpose. I took a PC fan and wired it up to an appropriate AC adapter. After wiring the fan, I plugged it into the safety approved power pack(internal breaker) and it worked perfectly, I also checked multiple times to make sure the AC adapter stayed cool(as well as the fan).
I then determine the direction of the air flow, and used a hot glue gun to position the fan to a metal jar lid so the air will be drawn from the room into the jar creating a forced air environment with nowhere to go. Running this fan in a jar for an hour I was able to drop the RH by a substantial amount, and was able to get the job done much quicker, than letting the air dry out with the lid off.
"Forced Air" (not to be confused with the Air Force!)
(pic will be added when i find it)
Conclusion - As with nearly all facets of growing, what is ideal for one grower, will not be ideal for the next grower in a different climate. Try a few different methods of drying, and find out what you like the best. If your bud is drying in less than 6 days, consider using one of the methods to slow down the process, or if your buds are taking longer than 2 weeks, consider one of the methods to hasten the drying process. As always, attempt to get your drying room climate as close to the ideal temperature and relative humidity as possible. Do the best you can, to preserve the fantastic terpenes, you worked so hard to get from fine growing skills!! Make sure you try various methods and see what You like best! Personal preference of drying and curing methods, coupled with the conditions you deal with, are key to an incredible harvest full of super stinky bud with exceptional flavour.
"Not for a free weed country or continent, but for a free weed world, unite and grow, for a better, kinder planet."
912GreenSkell
Harvesting: One trichome at a time
The time to chop is getting near....but when exactly is that? Trichome gland colour should be the final observation when the perfect time to harvest is, but pistil colour is also a good way to see the final stage of a plant's life coming to a glorious end.
Pistils and early detection of maturity :
Some guys think that going by pistil(aka stigma aka "hairs") colour is a mistake, but I use pistil colour long before I need to grab a tool to be able to view trichome colour up close. I don't even bother looking at the trichomes, until I see 90% coloured pistils. What I think is the perfect harvest point, is when I see the upper colas have mostly all cloudy trichomes with 10-20% amber trichomes. Harvesting during this point, ensures that I get both maximum yield, and maximum potency before the trichome heads start to degrade.
Pistils and their possible deception :
One important thing to point out when using pistils as a warning sign... They can deceive you if you are not careful!! If you are a "hands on" grower, and like to constantly handle and squeeze your flowers every bud that is handled in this way will have damaged trichomes(which can fake you out thinking they are amber naturally), and they will also affect the pistil colour, faking you out thinking they are withering, due to the colour change. Torrential rain storms, and cold weather, especially prolonged cold temperatures, also usually have this effect on Pistils.
Also, some strains goes through waves of flowering maturity. I have had plants that I could have sworn were finished, going by the Pistil colour (95% coloured), only to check under the Jeweler's Loupe to see 50% cloudy with 50% clear trichomes. A day later, 10% of White Pistils started to spring out. Another 2 days after that, and the plant was back to 30% White Pistils, and that plant went for almost another 2 weeks before she was harvested with a nice 10-20% amber trichomes.
Pistil colour is a fine way to know when to check trichome colour, but it should not be used as a solo means for harvesting a plant.
Trichome Colour and Effect :
There is quite varied effect possible harvesting at different times. Visual identification of trichome colour should be done on various parts of the plant, and ideally it should be done on the Calyx(aka empty seed pods).
Clear Trichomes - Clear trichomes often produce more of an up high effect, even with Indica dominant strains, though sometimes it can be a jittery type of buzz that many folks don't find enjoyable. This effect is also referred to as a "racy" high. Some people like the more energetic uphigh effect of a clear trichome harvest, so if you aren't sure, then take at least a couple of buds early on and see what you prefer. It might set the pace for harvest times for you on future grows.
"Clear trichome, around 50% clear and 50% cloudy trichomes on this plant"
Amber Trichomes - "Generally" amber trichomes tend to carry a lethargic couch lock or sleep inducing narcotic stone, when it can feel like it takes every bit of energy you can muster to simply sit up, and grab a drink or a snack that seem so distant at 2 feet away.
"Hyper Ryder SPG with 70% Cloudy and 30% Amber Trichomes"
Cloudy Trichomes - The most balanced of the three types of trichome types is the cloudy or "milky" trichome stage of maturity. This is the stage trichomes go through, after the clear stage, before they turn to the Amber colour, which is a trichomes final stage before they begin to degrade and potency drops below its peak performance. This is the stage you want to harvest plants. I prefer a mostly cloudy trichome with 10-20% amber trichomes. There will be some clear trichomes present if you take a whole plant at once, and they will be concentrated on lower buds that don't get as much light as upper buds, which lead to the next part, the selective harvest.
"Toofless Alien with 95% Cloudy Trichomes, and 5% Amber Trichomes"
Selective Harvesting : Maximizing yield and effect - This is really a great way to increase yields and effect from lower, often under formed buds. When you go to harvest your plant, you will see a big difference between the buds that are in the top light and the ones that lived their lives in less desirable light. Indoors or outdoors, you will see this variance. You will also see a difference in trichome colour on lower buds, which they are often a clear cloudy mix , when the upper buds are cloudy with some amber. I cut the colas off at the point, where I see the density dropping to the point where i would ask myself "Hmmm is this even worth trimming?"
Taking the top buds in one stage, and then leaving the lower buds to finish up for another 7-14 days will result in a much better harvest, and you will find that much of the under formed bud that would not be worth the effort trimming will indeed become bud that is worth trimming. On outdoor photoperiod plants, I have increased bud that is "trim worthy", resulting in an increase as much as 25% of the total plant yield. Worth doing for sure!! As this technique can be high stress(cutting all of the branches in half in a single day), always make sure you look at your remaining plant close watching for stress induced hermaphroditic traits to appear. If you see some appear, either observe closely and pinch the male pollen sacs as they appear(if its only a few here and there), or simply make the call to cut the plant.
In my opinion, Selective Harvesting is one of the best methods indoors or out to increase your yields on any plant or strain. Only an extremely small percentage of plants I have tried this on, had only a minimal positive impact on yield. If you have the time and space, this is highly recommended.
Trichome observation tools of the trade :
There is three tools that can be used to view your trichomes. One is a Jeweler's Loupe. These are super cheap to buy on ebay or amazon. I bought a 60-100X led battery backlight powered unit for $6 with free shipping, and it works well enough.
The second tool, is a USB microscope. I have a fancy one of these microscopes (nearly $100), but I found the learning curve to be very frustrating. If this is what you want, make sure to do some research, and find one that is easy to use. They have USB microscopes that go way beyond the magnification needed to view trichomes. Don't overspend by getting one that goes way beyond magnification for what you are wanting to use it for!
The other tool for viewing trichomes up close is a macro lens for a digital camera, or a macro app for a smart phone. If you are seeking a decent camera, understand that it does not have to break the bank. I have been running a Canon SD790IS with digital macro mode, and get this....you can buy one new for around $80 on ebay, or you can get one used for a measly $40. Its a very reliable camera, and takes excellent macro shots. Grab a cheap, flex tripod for $10, along with a decent SD card for another $10, and you are totally set.
The Art of drying your Bud :
No matter how well you have grown your buds, if you mess up the drying and curing stage, all that hard work growing the buds perfectly can be lost, or at least smell, taste, and potency will be diminished to at least some degree. Proper drying and curing, is a key component in getting the highest potency, tastiest, and stinkiest buds possible.
Getting the perfect drying environment can be very challenging, and in some cases, it is impossible without the addition of climate controlling devices such as Dehumidifiers, Heaters, Humidifiers, Air conditioning units, and Evaporative Coolers. Take it as far as you want, depending on your resources and situation, and your needs or desires.
The ideal climate for drying - If you are fortunate to have a fully climate controlled drying space, awesome you lucky devil! Ideally, you would have an area that is dark(certainly no daylight/sun) and is 45-55% Relative Humidity, with 60-70F(15-21C) temperature, along with a gentle breeze. Fresh air should be circulated into the drying area.
Many even most growers will not have a perfect climate controlled drying area to dry in, so we have to work around different challenges. Let's take a minute, and talk about climate adversity, and I do have a few extremes extremes to deal with!! In the fall after I harvest my outdoor, relative humidity percentage (referring to this as RH % from now on) is very high due to the changing of seasons from fall into winter. Tons of rain means relative humidity in my outbuilding sticks around 70% with Dehumidifiers running...ouch!! VERY far from ideal!
Working in Cold, Damp conditions:
Temps are also cool at this time of the year, and I often find myself chattering my teeth, as I am trimming my final plants in the unheated outbuilding(5-10C/41-50F). This is a very difficult situation to dry in. How exactly do we dry our bud to a perfect 62% when the humidity is 70% in the drying room?? The short answer is you don't, it simply doesn't dry properly, and if the air is stagnant you will face the bud curer's worst fear, the dreaded mold.
I have dried in this environment for many years and it can certainly be done, and you can still pull a high quality toke. I have done full branch hanging, defoliated leaf branch hanging, large paper bags on wire racks, and all without mold forming....as long as you have a nice gentle breeze blowing across buds for the hanging methods, or strong circulation from an oscillating fan for paper bag drying, I find mold to be a non issue.
I am fortunate to have a secondary drying space, which is the inside of a 100 year old cabinet, and for some reason the humidity is always much drier than the rest of the house in the damp autumn. It is usually a nice 50% RH, which give me a good space to final dry the buds in boxes until they reach a nice 65% Rh in the jar. More on jar curing in the later part of this guide.
Those is super high Relative Humidity trying to dry, might find it necessary to set up a small room, or a tent with a dehumidifier, to be able to get their bud ready for the jars. Drying in 80% RH+ is a pain in the butt!!
Working in Hot, Humid Conditions:
Our area in the mid summer (late June- mid august) is hot...sometimes a scorcher!! This is another tough climate to deal with. Excessive heat destroys fragile Cannabinoids, and also degenerates precious Terpenes resulting in a reduced scent.
Coupled with our very high humidity (60% minimum to 70% being usual) that we deal with when its brutally hot(close proximity to very large inland lakes means very high humidity when its super hot), makes this an extremely difficult climate to dry in. Out of necessity, I have dried in a heat wave in a small outbuilding before, and lots/most of the smell is certainly lost during the drying process.
Some varieties seem to hold their scents better than others when dried in a heat wave, but i would say all varieties that were dried in the heat seemed to have lost a fair bit of smell to some degree. Fortunately on the long cure, several of the varieties had noticeable increases of scent return after a few weeks to months of curing.
Different drying methods :
Whole Plant Hang - This is pretty much as old school as it comes. Ideally plants will be chopped and hung upside down, ideally with an oscillating fan lightly blowing across the plants. The duration of the time needed will be extremely varied depending on plant size, relative humidity, temperature, bud density, and circulation.
"Kosher Kush broken down into main branches and hung with fan leaves on"
Defoliated Fan Hang - Modified full plant hanging. For those in more humid areas this will help speed the drying process a bit, by allowing more circulation to the buds. Take the plant and remove all leaves with an exposed stalk, and then proceed to hang it upside down.
Wet Trimmed Hang - A few reasons to do wet trimming....you can trim far more in a day we then you can after it starts to dry out a bit. In a very humid drying environment, wet trim will certain help decrease dry times and also decrease chances of getting mold. The further you break the bud down to smaller branches the faster it will dry.
"Wet trimmed Hang G-13 broken down to 16"/40cm colas"
Inverted Wet Trim- This is a good way to semi speed dry some samples, without sacrificing too much quality. Grab a large cardboard box. Fold the flaps in and poke a bunch of holes with a screwdriver around 4" apart. Grab a bunch of smaller branches with some decent bud on it and trim them to finish. Put in fairly close proximity to a fan. If you are in a real hurry or are in really high humidity, cut the bottom out of the box and put it on top of a running dehumidifier for a more rapid dry time. I like to do this method to quickly test a few buds when i harvest a variety so I can get an early taste a couple of days before the rest is ready.
Paper bag/Box dry - In my opinion, this is the best method for getting top smell and flavour, but it comes with a higher risk of mold, especially for those in high RH, or those with a lack of circulation. I use large yard waste paper bags (double walled) for this. Final trim (fresh wet trim) into golf ball sized place evenly spaced with a 1/2" of more in between the buds. In humid climates leave the bag open and have circulation from a fan blowing across the open end of the bag. In dry climates, close the bag and use the fan blow a fan across it. Check every 24 hours. After an initial 24 hours passes, go through and flip the larger buds to promote even drying. Dry until a stalk barely snaps instead of folding over.
Those in drier RH climates are at a far less chance of mold forming, but I do believe that circulation across the bags is essential for this type of drying. Those drying smaller quantities, have had great success using single walled paper "lunch sack" bags kept completely closed for several days.
"Some Durban Poison Buds in a bag, after being wet trimmed"
Oh no! Overdried bud!
Don't panic!! This is not the end of the world by any means, and though it might seem like you are screwed, you are not. If your bud is 55% RH in the jars (also known as "duster" pot), there is a way to fix it. If you have a fairly fresh bud of another variety(do not use a totally fresh cut bud, better to use one that has dried a couple of days that would be in the 85%RH range), that is not completely dry(68-70%RH) then it a super easy fix. Simply take a fresh bud and throw it into the jar with the over dried bud and leave it in there for 12 hours and then allow to breath every 12 hrous while closely monitoring the hygrometer. Then remove the hydration bud, and leave the hygrometer in the jar for 6-8 hours and repeat the process if needed. The moisture from the bud that is not fully dry, will be sucked out and dispersed into the over dried buds. Some growers have used lettuce, orange and potato peels, to do the same thing. Make sure you remember to remove your hydration item(be it a fresh bud, or vegetable) when they have accomplished the ultimate goal of re-hydration!
REHYDRATION CAUTION: If you don't(or fail to vent properly), you can have white surface mold form within a couple of days.
Some guys also use Boveda 62% packs for this purpose as well. Boveda climate control packs are a unique item, which was originally made for storing expensive cigars and keeping the relative humidity of the sealed container right at 62%. Boveda also has other % climate control packs available for those that like a slightly damper, or drier bud. I am not an expert on re-hydration, I have done it a couple of times, but its extremely rare that I overdry any bud, so I just haven't got to use these techniques very often, including boveda climate control packs.
Trimming methods 101 -
One of two trimming methods will be used, depending which drying process you will use, will determine what trimming process will be used.
Method 1 "Wet Fresh Trim" - This trimming method will give you absolutely beautifully trimmed buds. Trimming, while the leaves are still springy and full of life(up to 24 hours after the cut), is very productive, and finished buds are very clean when done right. First, take a nice cola of 1 foot or so in length. Go through the entire cola and break off all of the fan leaves with no visible trichomes. I take pretty much every leaf with a visible leaf stalk and little to no visible trichomes. Discard the fan leaves. Now, working from the bottom of the branch to the top use a pair of fine tipped scissors, and cut off the leaves with visible trichomes into a box. These leaves will be kept for hash or edibles.
Depending on your drying method, either cut the buds off the stalk(if you are paper bag drying), or trim the cola as best as you can if you are defoliating fan hang drying. If you are doing a full wet trim, then continue on, and finish trimming the buds removing virtually all leaf, and leaving only beautiful flower behind.
Extending the wet trim duration - treat 'em like flowers!
If you have ever solo trimmed a huge plant, you will know that it is impossible to wet trim a monster by yourself in a single day. You can get so much more trimmed in a day when its first cut fresh. Day 2 the trimming goes okay, but what you can do in a day drops, and by day 3 after the cut, it turns into a trimmers nightmare, until its nearly dry. This is something I messed around with last year, and wow does it work!! When I first chopped the plant I cut the branches into manageable sized stalks (4 foot branches) I took a bunch of 5 gallon pail and filled them with 4" of water. Thinner branches, I tied together with some plastic coated wire in bunches of 6-8 branches. Put the branches in the water and they will stay fresh cut perfect for at least an additional 24 hours. After 72 hours they are a bit wilting, but the difference is amazing.
Now the negative with this technique...it will vary your drying time by quite a bit, especially if you are pushing into 3 days after chopping.
Method 2 "Dry Trimming" -
Arggghhhh the dry trim. If you have ever tried to dry trim a monster plant, you know why I am so unhappy with this method! You have to have large containers that you can shut airtight, or your stash will dry out on you, before the task is done. I find dry trimming the most tedious method of trimming. The process is simple. Let your bud dry out (either fan leaves removed or intact depending on which method you are using), until there is just enough moisture left in them when you take a bigger bud and bend the stalk it barely breaks instead of bends.
Try out dry and wet trimming, and let me know what you think!
Method 3 "Machinery : Welcome to the age of industry"
The Wet trimmer - I did a lot of research on various power and manual trimmers, and the selection and effectiveness from what I saw on these machines is nearly as vast as their differences in cost. Some wet trimmers can be bought for as low as $100 (manual bowl trimmers, or do it yourself blade trimmers similar to trim pro), but reviews are very mixed on these products, and they sure do seem to damage a lot of trichomes, or don't get a very close trim! Upward in price from there, there is many different options in various wet trimmers, all the way up to machines that cost $20,000 and even more for the large complicated commercial machines.
The Dry Trimmer - Again, I did quite a lot of research on these machines, and from what I have seen the dry trimmers do a better job, and are gentler on trichomes than wet trimming machines. There seems to be a more varied selection of wet trimmers available than dry trimmers. Dry trimmers can be fairly valuable units, ranging from about $400 to $2000 for larger commercial units. A certain environment is needed for dry trimmers to work properly. If you try to run these machines in 60-70% relative humidity, the outer leaves that you want the machine to break off won't crisp up enough, and the machine will not work properly.
I recently received a Toms Tumble Trimmer 1900 series trimmer to try out this fall. From the reviews I have watched, I am very excited to see this machine in action!! Toms Tumble Trimmer 1900 can trim about 80-85% of the leaf, which is a HUGE saving in time versus normal trimming, and it can do a large amount of product in a short time. The TTT 1900 should be able to 80-85% trim 2-3 pounds of dry bud in less than 10 minutes. Very impressive indeed!! After the autumn harvest happens this season, I will update this section.
Tools of the trade -
Dehumidifier - Those with humid drying spaces will find a dehumidifier very valuable. The smaller the space the easier it will be for the dehumidifier to decrease the moisture in the air. In the worst humidity I find it useful to run the dehumidifier in front of an oscillating fan to spread the dry air coming out of the Dehumidifer.
Humidifier - Those in hot, arid climates will find use in humidifiers, but to be honest unless you have a whack of weed to dry, drying in double walled paper bags, will slow the drying process enough to give a decent drying process.
Air conditioner - You will only need one if these if you live in a hot, humid climate. If your drying space is over 70F (21C), some of the more volatile terpenes will start to disappear. If you get 80F (26C) drying speed will increase resulting in a harsh toke, and terpenes will really start to get lost. If your drying space is hitting temps of 90F (32C) or higher, and you will lose lots of your fantastic smells and taste. High temperatures I believe, is the largest key factor involved in getting a diminished scent and taste.
Heater - Man, I hope you don't ever need one of these in your drying space!! Personally, I don't see a big deal with low temperatures, as long as the temps aren't getting to freezing point, and turning your half wet buds into budcicles!! I would rather a slow drying process than a fast one for sure!! If you are in a rush to get some dry weed and conditions are cold, consider adding a heater, but be careful! Heaters can often start fires, and you should be cautious using one. I use one, but not for increasing the room temperature, instead I use it so I don't freeze my ass off while trimming the last plants of the season!!
Evaporative Cooler - This seems to be the ultimate solution for those is super low humidity arid areas. These units will increase RH% while simultaneously decreasing temperature. Very useful indeed for those in hot and dry climates. They don't seem very expensive either in the $150 range for one that does 500 square feet.
Oscillating Fan - This is a necessity in the drying process, especially in humid climates. One of the tall stand up models with multiple settings is ideal. Always use a fan on rotating(oscillating) mode, as you don't really want it to constantly blow in one section of hanging plants of bags of buds, instead its better to move the air every 10-15 seconds or so.
Thermometer/Hygrometer - These are key in both the drying and curing process. Feel free to buy a bunch of small, cheap hygrometers. Some will be inaccurate, which is totally fine. If you have a bunch of extra money to burn, then feel free to spend $20 or more per hygrometer for one that can be calibrated, but for me I am content with the small cheap $1.50 units imported from china. They are generally close enough to accurate, and using the test below, the variance is easily kept track of.
When you get a bunch of jar hygrometers, the first thing to do is set them all up side by side. If you bought more than two or 3 there will almost certainly be a difference in the RH% readings. Now, do this test below to find out which ones (if any) are totally accurate. The units that are not accurate, take a small sticker and write the variance on it, and stick it to the side of the hygrometer so you know what the real humidity is(for instance the hygrometer might read 4% higher than 75% when you do the salt test below, which you then know the unit reads 4% higher than it should, so in the jar you would want it to read 66% instead of 62%).
Calibrating Hygrometers : The salt test
When salt and water are in a saturated solution at equilibrium, the resulting humidity is 75%. This gives an excellent reference point to calibrate hygrometers.
Components needed:
Ziploc bag or airtight sealable container
Pop or Beer Bottle Cap (or other small container)
Small amount of salt (regular table salt)
Water
Hygrometer(s)
Salt Test Procedure :
1 - Place the salt in the bottle cap (or other small container).
2 - Dampen the salt with water. Do not put so much in that the salt gets "sloppy". You want a well dampened pile of salt in the bottle cap, not a soupy pile.
3 - Place both the hygrometer and the bottle cap full of damp salt in the ziploc bag and seal it well. It is important not to let air in or out for this test to work properly.
4 - Keep it like this for 8 hours.
5 - After 8 hours in the damp salt environment, the actual humidity inside the bag will be 75%. Compare it to your hygrometer, your hygrometer should also read 75%.
6 - If your hygrometer is not showing 75%RH, you will then know exactly how far off your hygrometer is. If it is not accurate, note the amount and direction that it actually reads and be sure to add or subtract that amount when reading the hygrometer. If the hygrometer has a control to adjust it, you can set the hygrometer to 75% directly after the test.
Different methods of drying in different adverse climates.
Hot and dry - This is likely the hardest climate to dry in to get really high quality smell and flavour. Heat and light destroy terpenes quicker than anything else, and dry relative humidity speed dries the bud too quickly, which can often result in a harsh toke.
- Slow down the process by doing a full plant hanging with fan leaves intact.
- Slow down the drying process by leaving buds on thicker branches and dry in paper bags.
- Get an Evaporative Cooler. It seems to be the ultimate solution for folks with hot and dry climatic challenges to overcome.
Cool and Damp - Circulation is key to success here. Several methods of drying can be used in humid, cool climate, but know that every drying method that slows down the process, comes with a greater risk of mold forming. For this reason the trimmed wet hanging technique is most recommended, or defoliated hanging technique. Constant monitoring of the buds is essential. Using a Dehumidifier is also recommended, it will take some of the moisture out of the air and also add some warm dry air. Running an Oscillating Fan to blow the drier stream of air coming out of the top of the Dehumidifer across the buds will aid in the process of drying.
- Use the wet trim method to speed the drying process.
- Speed the drying process with the combined use of a fan and dehumidifier.
"Trimmed wet wall of buds from a single Frisian Dew plant"
Jar Curing - The time has come. Your buds are dry enough to put into jars! I feel buds are ready to put into jars when I grab a larger sized bud and try to bend the main stalk over and instead of it folding over it barely breaks instead. As you go to put the buds into the jar Make Sure you inspect the buds closely for any mold. Putting moldy bud in the jar can spread and ruin whole jars of bud.
I find after 12 hours in the jars, bud that had stalks that barely snapped instead of folded will be around 65%-68% relative humidity. What just happened? The buds felt dry when they went in the jar, and now they feel spongy and damp? The consistent environment of the jar has drawn the moisture out of the inner stalks, and dispersed it evenly through the contents of the jar. This will accomplish two things. It will draw moisture out of the biggest buds with thick stalks, and it will also rehydrate the small buds with thin stalks that may have been slightly over dried, while waiting for the larger buds to dry out enough for the stems to snap instead of fold. If the Hygrometer reads 70%RH or higher, after 12 hours of being in the jar, then remove the buds from the jar, and spread them out in a paper bag or box, and dry for 6 hours, then repeat the process.
If you are reading at 68%RH or lower after 12 hours, then you are ready for the rest of the curing procedure. Open your jars for one hour each day, and then close your jars back up for another 12 hours...repeat this procedure until your jars read 62%RH after 12 hours with the lid closed tight.
Speed Curing : For those short on time
There i was....my weed was dry but not quite dry enough, reading 68% and I was destined to go fishing for a week, in just a couple of days...arghh. I needed this weed to dry out, but i didn't want to sacrifice too much quality, so I devised a special instrument for this purpose. I took a PC fan and wired it up to an appropriate AC adapter. After wiring the fan, I plugged it into the safety approved power pack(internal breaker) and it worked perfectly, I also checked multiple times to make sure the AC adapter stayed cool(as well as the fan).
I then determine the direction of the air flow, and used a hot glue gun to position the fan to a metal jar lid so the air will be drawn from the room into the jar creating a forced air environment with nowhere to go. Running this fan in a jar for an hour I was able to drop the RH by a substantial amount, and was able to get the job done much quicker, than letting the air dry out with the lid off.
"Forced Air" (not to be confused with the Air Force!)
(pic will be added when i find it)
Conclusion - As with nearly all facets of growing, what is ideal for one grower, will not be ideal for the next grower in a different climate. Try a few different methods of drying, and find out what you like the best. If your bud is drying in less than 6 days, consider using one of the methods to slow down the process, or if your buds are taking longer than 2 weeks, consider one of the methods to hasten the drying process. As always, attempt to get your drying room climate as close to the ideal temperature and relative humidity as possible. Do the best you can, to preserve the fantastic terpenes, you worked so hard to get from fine growing skills!! Make sure you try various methods and see what You like best! Personal preference of drying and curing methods, coupled with the conditions you deal with, are key to an incredible harvest full of super stinky bud with exceptional flavour.
"Not for a free weed country or continent, but for a free weed world, unite and grow, for a better, kinder planet."
912GreenSkell
Attachments
Last edited:


