Hey Guys, I thought some of you might enjoy seeing the totes I use for my DWC operation. In the past I have used 18 - 20 gallon storage totes from Walmart or Lowes, but was never happy with either the cover design or how they would bulge out on the sides once filled with water. I was lucky to have a friend who worked at a delivery business and he gave me these, but they are available on line. These particular ones measure 27"L x 17"W x 12"D.
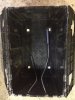
If you can find some used, be sure to check for cracks or holes. I found the best way to check was to hold the tote up to the sun upside down and look up through the inside. Some have drain holes drilled in the bottom, such as the one here did. I cut some little squares of PVC from an old piece of plastic gutter pipe I had and glued them over the holes using 2 part PVC cement.
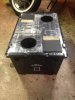
I used a 5" hole saw for the net pot holes, and 4" for the inspection hole under the flap. I'm not sure what the material is that I made the flaps with, "something I had laying around" but I think a piece of rubber inner tube would work fine. Just be sure that it is solid so light cant go through it. The hinge is just some nylon strap glued to the tote but you can use your own design. After that, simply drill some 1/4" holes for your air hoses. I drill both ends of the tote so I don't have to remember which way the tote goes in the grow room. Also, I will add more air to the tote if I have a free air line. The foil tape on the top was an after-thought, but it seems to brighten up the room better. Cant hurt!
The only other thing I've changed since this picture is to draw a line inside the tote with a marker 6" from the bottom all the way around. This keeps the water level about 1" below the net pots and in this particular tote, the amount of water equals exactly 10 gallons. That's a huge plus to me when it comes time to do a nute change. I can do the math in my head even whilst impaired!
If you can find some used, be sure to check for cracks or holes. I found the best way to check was to hold the tote up to the sun upside down and look up through the inside. Some have drain holes drilled in the bottom, such as the one here did. I cut some little squares of PVC from an old piece of plastic gutter pipe I had and glued them over the holes using 2 part PVC cement.
I used a 5" hole saw for the net pot holes, and 4" for the inspection hole under the flap. I'm not sure what the material is that I made the flaps with, "something I had laying around" but I think a piece of rubber inner tube would work fine. Just be sure that it is solid so light cant go through it. The hinge is just some nylon strap glued to the tote but you can use your own design. After that, simply drill some 1/4" holes for your air hoses. I drill both ends of the tote so I don't have to remember which way the tote goes in the grow room. Also, I will add more air to the tote if I have a free air line. The foil tape on the top was an after-thought, but it seems to brighten up the room better. Cant hurt!
The only other thing I've changed since this picture is to draw a line inside the tote with a marker 6" from the bottom all the way around. This keeps the water level about 1" below the net pots and in this particular tote, the amount of water equals exactly 10 gallons. That's a huge plus to me when it comes time to do a nute change. I can do the math in my head even whilst impaired!