PH - Potential Hydrogen - The Manual - Polled

Did this thread help you to understand PH and growing better?


  • Total voters
    22

JM

Regenerative Ag Student For Life
Joined
Jan 2, 2011
Messages
10,782
Reputation
1,610
Reaction score
6,248
Points
0
Website
www.youtube.com
THREAD LOCKED UNTIL COMPLETION


Meters JM uses and endorses:
View attachment Hannah 98129_98130.pdf
View attachment Accurate pH 8.pdf

This will be the full ph manual. Muddy and I have agreed to work in conjunction to make a more complete, in one place manual for PH, also known as Potential Hydrogen. So whether you're a noob or a pro... you'll probably catch a tip or 2 here.
132838d1349574093t-ph-potential-hydrogen-manual-brow.gif


This thread will be closed while its under construction:

To Start (excerpt from: https://www.autoflower.org/f7...s-list-11.html ) :

I have been doing a lot of research on sick plants and also helping out others a lot on sick plants!
Most of the stuff I have learned is from others and keeping up to date on there problems they are having. Some I have learned on my own, the sick plant troubles I have had was ph troubles! I didn’t really think the importance of how ph plays a role with your plants being healthy or dead.

I honestly think one of the most important parts of your growing is having a good solid ph tester, a digital one is the best to have. There are other ones you can buy as well, liquid ph test kits are inexpensive and get the job done if you can't afford a digital ph meter, STAY AWAY FROM SOIL TESTERS, they don't do the job and are not very accurate at all. If you get a soil tester, get a good one.. Accurate 8 makes a good one... (get the 12" probe version: )Ph test strips work well, even if you are on a budget! So if you rely on a soil tester and its tell you your soil is 7 and your having problems, 9 times out of 10 it's going to be your water ph that is messing up the soil ph check the water you are using. Unless you are using additives in your soil mixture like blood bone meal, and Peat moss those will throw your ph off too.

Adding nutes to your water can cause the ph to get low as well, so its best to test your ph of your water before and after you add your nutes. Nutrient deficiencies are mostly caused by human mistakes,along with to much or to little of the amount of nutrients available. The best range for nutrients to be absorbed is between a pH of 5 and 7 (ideally 6.3 - 6.5) and a (TDS) range of 800 to 3000 PPM.

Having these conditions will help making nutrient deficiencies a lot easier to overcome.
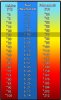
Charts:
ph vs uptake.gif
ph vs uptake 2.jpg
ph vs uptake 3.jpg

120296d1296842079-ph-potential-hydrogen-manual-ph-vs-uptake.gif


120297d1321943212-ph-potential-hydrogen-manual-ph-vs-uptake-2.jpg


120298d1317944817-ph-potential-hydrogen-manual-ph-vs-uptake-3.jpg
Now on to optimal PH:

They say a picture is worth a thousand words and a symbol worth a thousand pictures:

How about just 2 graph pictures? I think its congruent! :)


So now the picture on PH is probably coming together for you if you weren't already familar.


Example of PH being out on a flowering Auto Cinderella 99:
View attachment 135206
View attachment 135205
120265d1345925447-ph-potential-hydrogen-manual-dcp_1417.jpg

Example of Good ph on a HighRise Seeds Island Sweet Skunk:
View attachment 135208
View attachment 135207

not much dif... but...
Chart again:
ph vs uptake.gif

Diagnostic Chart:
ph lockout results.jpg


other self-diagnostic threads:

https://www.autoflower.org/f7/self-diagnose-your-plants-basic-deficiencies-list-11.html


120267d1345774160-ph-potential-hydrogen-manual-dcp_1345.jpg


120266d1345774251-ph-potential-hydrogen-manual-dcp_1352.jpg
 
Last edited:
What is PH?
What is pH?

Note: some of this article goes into aquaculture (for fish) but the same principles apply... Read this through to get a good in depth understanding of PH.. then move to my next post.. which comes from mossys© ™ and FD© ™ about using vinegar and baking Soda as PH buffers for your water (whether soil or hydro).

:)


The “H” in pH stands for Hydrogen and the “p” stands for the power of that Hydrogen --the concentration of hydrogen ions in a solution. That Hydrogen concentration is very important for living things because Hydrogen ions are positively charged and can, therefore, alter the charge environment of other molecules in a solution by putting a force on the molecule causing it to change its normal shape. For a protein molecule this is crucial because the shape of a protein is related to its function. A low pH count corresponds to a high hydrogen ion concentration and a high pH count corresponds to a low hydrogen ion concentration. A substance that when added increases the concentration of hydrogen ions (lowers the pH) is called an acid; and a substance that decreases the concentration of hydrogen ions (raises the pH) is called a base. There are also substances that enable solutions to resist pH changes when an acid or base is added. These substances are called buffers. Buffers help organisms maintain a relatively constant pH. Pure water is considered neutral with a pH of 7. Solutions with a pH less than 7 are said to be acidic and solutions with a pH greater than 7 are said to be basic or alkaline.


What about the Ammonia Levels?

All urine contains ammonia and tilapia urine is no exception. Some ammonia is even excreted through their gills; and ammonia also comes from the break down of their solid waste. In a lake or pond, the ammonia levels are of no concern because there is so much water compared to the number of fish; but in a tank, ammonia levels need to be carefully monitored because ammonia is toxic to the fish.


What Bacteria? How does it relate to the Nitrite and the Nitrate?

There are actually three crops in an Aquaponic system--the fish, the plants and the very important beneficial bacteria. It’s the bacteria that convert the toxic components of the fish waste, like the ammonia, into a form of nutrients that the plants can use. There are actually several types of bacteria living in an Aquaponic system; and each one performs a specific job. Without them, Aquaponic food production would not be possible. As an Aquaponic farmer, you have absolutely nothing to do with introducing, controlling or monitoring the bacteria. It all happens just as it should--naturally as a part of the process of life itself.

Autotrophic Bacteria is a term that describes two function-specific bacteria. The first one, nitrosomonas, uses oxygen to convert toxic ammonia into Nitrite; and the second one, nitrobacter, converts the Nitrite into Nitrate. Since both the ammonia and the Nitrite are toxic to fish, these two bacteria are crucial to the system. Nitrate being much less toxic than ammonia, can be tolerated by most cultured fish until it reaches very high levels. Once this autotrophic bacteria process is complete, the resulting Nitrate ions are controlled by the plants themselves.

Heterotrophic Bacteria is the term that describes how specific bacteria convert solid fish waste into ammonia and other elements. These two types of bacteria occur naturally. They habitat the plant roots, the water, the tanks, the pipes and the media (See Grow Beds) in an Aquaponic system. Their growth and density depends on the water temperature, pH, surface area, flow rate and salinity (saltiness). Since the bacteria are not visible to the human eye, you can’t measure or monitor them. So the only way you know your bacteria crop is a healthy one is through testing the levels of ammonia, Nitrite and Nitrate, which you can do.


What happens when the Fish are introduced to the system?

The first thing that happens when you place the fish in the water is they continue their natural cycle of elimination of urine and solid waste; and guess what, the ammonia level rises (for about the first 10 days). Then as the ammonia level starts to fall, the nitrite level elevates; and you know your friendly little nitrosomonas have been busily converting ammonia to nitrite. They do this for another 10 days until you see the nitrite level start to fall and the nitrate level start to rise as your nitrobacter go into action converting nitrite to nitrate. After 20-30 days, your system will stabilize and the nitrification cycle will proceed naturally indefinitely. At that point, your job as the Aquaponic farmer is to regularly monitor your ammonia, nitrite and nitrate levels so you know your water quality is the best it can be for both your plants and fish.


What’s the ideal Water Temperature?

As I explained on The Fish page, the ideal water temperature is a variable that depends entirely on what fish species and what plants you are growing. Tilapia thrive in temperatures between 70-85 degrees F, but most Aquaponic farmers keep their Tilapia tanks between 72-74 degrees F, which is a compromise between the fish temperature requirements and the plant requirements. Aquaponics is a multi-faceted system in which one component effects one or more other components. Water temperature is a cross-affecting component. It affects the oxygen levels, the amount of unionized ammonia (ammonia not yet converted to nitrite ions) and the amount of salinity (salt) in the water. Warm water has less oxygen than cold water. It also has a greater proportion of unionized ammonia and more salinity than colder water.


What about Water Oxygen?

Even water life needs oxygen. In fact, the water oxygen level, called dissolved oxygen, is one of the most important water quality components in an Aquaponic system; and it needs to be monitored often. The best levels of dissolved oxygen are close to 80% saturation, which translates as 6-7 milligrams per liter. Levels below 3 milligrams per liter are a hardship on aquatic life and levels under l milligram per liter are deadly. Both the time of day and the water temperature affect the dissolved oxygen levels. Cold water has more oxygen than warm water. The late afternoon is when dissolved oxygen levels are the highest and early morning (sunrise) is when they are the lowest. Even weather affects dissolved oxygen levels. Cloudy and/or rainy days cause them to go down. Too many fish in the tank can also deprive the fish of dissolved oxygen as well as too much food. If the water is saline, it also has less oxygen than fresh water has.

When your fish are oxygen deprived, they let you know by exhibiting the following traits:

appetite loss, surface gasping, inflow pipe gathering, retarded growth, susceptibility to disease and succumbing to parasites.

There are two ways to test your oxygen levels--the cheap way and the expensive way. The cheap way involves an inexpensive Test Kit that gives you the DO (dissolved oxygen) level. It takes a little time and is not precise but gives you a ball-park number. Then there’s the DO Meter, which costs anywhere from several hundred to a thousand dollars. It’s fast and precise for a price.


What is Alkalinity?

There is much confusion around the terms Alkalinity and pH as they are often mistaken for each other. Why, because they are both measurements, but they measure two different things which are related but not the same. Alkalinity is a measurement of water’s ability to neutralize acids also called water’s buffering ability so it refers to the ability of water to resist change in pH. These buffering materials are called bases and primarily include bicarbonate and carbonate. If you reread the pH section above, you see that pH is basically the measurement of the concentration of hydrogen ions in water, in terms of acidity or alkalinity. Water with low alkalinity is very susceptible to changes in pH. Water with high alkalinity is able to resist major shifts in pH. Alkalinity is measured by titration. An acid of known strength (the titrant) is added to a treated sample of water. The volume of acid required to bring the sample to a specific pH level reflects the alkalinity of the sample as indicated by a color change. Alkalinity is expressed in units of milligrams per liter (mg/l) of calcium carbonate. The acceptable level of alkalinity in aquaponics has a broad range between 50 and 300 mg/l. Your job as an aquaponic farmer is not to concern yourself with the science.


Source--From Where Comes Your Water?

Source may be last on this list; but it is by all means not least. When you unpack and place your Aquaponics USA food-growing system, the first thing you need to decide is where to put it. Now you may think that the second thing you need to do is fill it with water. But there’s an important interim step right here. You need to know what’s in your water before you expose either fish or plants to it. There are four possible sources for water. They include: well water, municipal water, rain water or water purified by reverse osmosis or ozone. You need to have your water tested by a laboratory that specializes in water for agricultural use to make sure it’s not going to be harmful to your fish, veggies or bacteria. Ideally, it would be best to have this done while you’re waiting for your complete, compact food-growing system to arrive.

Remember our discussion about pH above. Your source water should have a neutral pH of 7 or at least be in a range of 6.0-8.0. Well water can be superior to municipal water because it often has trace elements like calcium, chloride, sodium or iron. These trace elements in small amounts can be beneficial as these elements are sometimes deficient in an aquaponic system. Municipal water often contains chlorine which is toxic to both your fish and your plants. If you know your water source has chlorine, you must arrange to have it removed before placing fish and/or plants in it. There are several ways to accomplish the removal of chlorine including: purchasing a water purification system for your entire home so not only your fish and plants are chlorine free but your family is also. You can also purchase a unit that attaches to the hose you use to fill your system. Chlorine can also be removed with lots of aeration. You let your system run for a couple of days with only water in it to allow the chlorine to dissipate. You need to use a chlorine test kit to signal when your water is safe for your fish, plants and bacteria. A safe level is less than 1 mg/l of chlorine. Another toxic element in municipal water is chloramine which can be removed using a chemical water conditioner.

There was a time when rain water was an excellent source of water for an aquaponic farmer; but it’s no longer reliable and can often contain contaminants especially in large cities where “acid rain” is a known occurrence. We also do not recommend reverse osmosis water unless you’re supplementing it with minerals due to the fact that it is lacking in anything that may be beneficial to your plants or fish. If your water is highly alkaline, then an RO unit may be required. We have found it necessary to install one of these ourselves due to the high alkalinity of our well water. Once your system is filled with good source water, you need to circulate your system for a day or two to bleed off any gases that it may contain. This also allows you to monitor and test your system to make sure it is working properly before adding the fish and the plants.

 
Last edited by a moderator:
Lockouts and Other Issues ( Effects on Autos Growth / Yield): The Manual

So now you're getting ph down... there are some great vids above that describe in even more detail the concepts we're discussing.

Allow me to iterate something on the matter of Autos, Yield, and PH.

Example 1:

A 70 Day Autoflowering Strain.

Say ph is good for the whole grow excepting one bad swing:

often PH issues don't show for 2 or 3 days... sometimes longer.

Calculate:

Plants good to 14 days.... then a PH issue occurs

days 14-16 - hasn't shown up yet 2 days
day 16 you notice and begin corrective action
takes 2-5 days to correct back (we'll say 3)
then 2 days for the plant to catch up again.
so now you've lost 7 days out of 70... and whats worse... during the beginning of peak vegetative phase.
so 10% of your total grow time... but lets break it down a hair more:
70 day variety... shows flower at roughly 21 days... really starts flowering at 28 - 35 days.. so we'll call it a 30 day veg cycle.
so 7 days you lost of 30
7/30 = 23.333% of the total veg time of the plant. and since veg is size, which is what supports yield... you've cut your yield drastically. The problem is further compounded by another factor we'll discuss later in this article.

Example 2:

Lets compare to a fast photo variety:
We'll take White Widow for example. At 8 weeks flowering cycle, that's 56 days,
2 weeks to establish a good clone or get a seed started to size, that's 14 days,
and then a solid 30 days to veg, that's another 30 days for a total of 100 DTM (Days to Maturity)

say we go through the same problems as above... we'll adjust the math.
7 of 44 days veg = .159 or about 16% of the veg time (we're combining establishment and veg time here because they do grow some during that time)
7/100 = .07 or 7% of the total time. now that's just the math comparison.

We also have to look at it from a biological standpoint, as plants are also living beings. So now we have to consider factors like Mitosis, or cell division. This is how plants grow.

http://en.wikipedia.org/wiki/Mitosis
From the wiki:
Mitosis is the process by which a eukaryotic cell separates the chromosomes in its cell nucleus into two identical sets, in two separate nuclei. It is generally followed immediately by cytokinesis, which divides the nuclei, cytoplasm, organelles and cell membrane into two cells containing roughly equal shares of these cellular components.[1] Mitosis and cytokinesis together define the mitotic (M) phase of the cell cycle—the division of the mother cell into two daughter cells, genetically identical to each other and to their parent cell. This accounts for approximately 10% of the cell cycle.


mitosis1.png
Mitosis divides the chromosomes in a cell nucleus.

mitosis2.jpg
Allium cells in different phases of the cell cycle, some in mitosis.

When you consider this, you start to realize how exponential growth really is...
For experimental sake, we'll work with some very unrealistic numbers;

Say you plant a seed... and its 100 cells (Way way way way more realistically)
it starts growing... each cell dividing into 2, and again, and again

100 cells ---> 1000 cells ---> 10000 cells ---> 100,000,000 cells
that's only four layers deep.... imagine after 70 days of growth how this occurs...

so when we lose, say 7% of the total growth... EARLY on... think how much that affects TOTAL growth as your limiting the base numbers of cells for total division.


Hope this helps you to understand the real deal with how important ph is. - JM​
 
Last edited by a moderator:
Further PH, Water, aeration:

FD's iteration on Water:

So i guess the first topic I'll start on is a little secret of mine. This is available to everyone and the best part about it is that its free. It contains high levels of life sustaining minerals and can do magical things to your grow.

I know that several of you soil growers focus on using RO water or distilled water. Something that has not gone through the city treatment plant is usually ideal. Most of the chemicals, such as chlorine, can take a toll on our precious ladies. Not to mention the fact that it has a pH typically some where in the seven range. So with those two items in mind you can already see the issues with using water from the tap. Its almost as you have to revert it back to a natural state kind in the same fashion that RO does.

This is the main reason that i do not use tap water at all! I take too much pride and time into each and every plant I start to have them destroyed by attempting to give them what they need to survive. So i had to come to a solution in where i didn't have to go to the store all the time and purchase distilled or RO water. Or even worse sink more money into a RO system for the home. So i started doing what I know best and have done for years as a Veggie Gardner. I started harvesting rain water.

Now most of you may think that there isnt much that this stuff can do over RO water or distilled water but i beg to differ. Before you decide to skip to the next thread hear me out a little. I started using rain water on my plants about a year ago. There are a few things that I do to the water before feeding, and I'll cover them, that help keep it balanced. First thing that I will tell you is that it falls at almost the ideal pH range for our ladies, coming in at anywhere from 5.0-6.0. Almost every ounce i have harvested has been right at 5.8-6.0, and I just add a buffer to the water to maintain the same pH level until that gallon is gone. Now this may vary form area to area based upon climate conditions and pollution, which results in acid rain, in the area.

When I was using RO water i would have to constantly monitor the pH, whether in soil or hydro, and most of the time I had to take it down like most of us do. This was a pain in the ass to me. There are already enough things that I have to monitor and look at that I didn't really need another and I had to find a solution to this to make it work like clock work. I wanted to be able to test the water at anytime and get the same results as i did the last time i checked levels and it be persistent. I tried a few things to develop a more balanced consistency in the water and with the RO this did not happen. Leading me to find something cheaper as well as more stable. This is when i began to place buckets out side and catch a little rain water and begin my testing.

First round went well, after collecting a little over a gallon of water i began my first set of tests. The water at that time came in at 5.9, so I decided not to buffer it and see how many days it took to balance out to 7. It took 5 days to come all the way back to 7. In my experience with RO water it was back to 7 in 2-3 days. So this cut some of the time I was spending checking levels in my water back. Then I decided to buffer the water to 6.0 with a solid pH up additive. After making this change to the water I was able to hold the water at 6 for over a week. This was great for me. I now could check the water once a week and know that I know its the correct pH. Mind you i am very obsessed with the pH of my water as I have learned it can destroy everything you have worked so hard for.

So with this new found access to free life essentials for my ladies I began pushing it further. I wanted to get as much out of what I had as well as keep it fresh and clean for my ladies. After a few more tests and placing a few theories into place I found a way to keep the water pH perfect and loaded with Oxygen for the entire time the water was being used. I typically prepare two gallons at a time as I keep a small grow most of the time. I am in this for two things, the joy of botany and personal consumption. I don't believe in making a profit off of something that God has given us free.

I have the advantage of having an additional fridge in my garage that is only being used for the freezer, so I had tons of room to store the water chilled. This was part of the process of keeping the water at good pH levels. Not only did this assist in keeping the pH levels right but it also prevented any bacteria that may be in the raw water from growing, so no disease. Once I began this I realized that over time of storage that the water would loose any oxygen that it had in it. I needed to find a way to keep it in there as I used the water for feeding. Now I usually feed every three days, unless the soil becomes dry before then, but with in those three days I know the levels of O were depleating and by the time I reached the end of the res the O levels had to be minimal, if any. So I figured that I would give something a try that I knew kept another form of life alive for quite some time in water. This was the little tabs from WalMart you can get for your portable Minnow bucket. Yes, they sell little tablets that you can place in the water to keep O levels at peak for any reason, whether it be minnows, or in my case high levels of O for a special root system.

Now that time has passed I have this system in full operation with pumps now rather than placing a tab in the water every three days. So with the water being chilled, and Oxygen levels staying high I no longer have to buffer my water except for the time I place it into the "feed" res. Once in there it stays at 5.9 till the last drop, and I've tested that last drop lol. I have had amazing results using this method. Like I stated above I have had to purchase any water since, I have a few collectors out back now that catch and filter out the leaves and other garbage, and I have an unlimited supply for both my veggie garden as well as my "herb" garden.

Vinegar moves PH from alkaline to Acid...
5 ml (1 tsp) of vinegar to 1 gallon of Water moves PH down by 1+/-
(ie: ph at 7.0 ---> add 5ml vinegar... stir thoroughly ----> Retest ---> PH at 6.0 now)

I don't remember the baking soda one because its been a long time since I had an acid water condition. I will say this, proceed with extreme caution in regards to quantity. I'd say start with 1/4 tsp to 10 gallons and make sure to wait 30 minutes of stirring agitation time as baking soda is a very slow buffer. Dolomitic lime works as well and can be used a little more liberally and has the added benefit of calcium and Magnesium addition as well, but its even slower on pH swings.

Of course, there are water amendment chemicals specifically for growing hydroponically etc. It might better serve you to use pH UP solution if you don't wanna screw around a lot and need to make adjustments.

One thing I can say is equally as important an investment as the seeds you buy and nutrients you use and light you use is...

A GOOD PH METER

I personally have the Hannah Instruments HI 98129.

This meter was about $120 US and does PH, TDS, and EC as well as on board temperature compensation (and readout) as well as have a replaceable probe (Can u guess what usually fails over time on a ph meter? yup.. the probe. The meter comes with the tool for removing it and I understand the probes are only about $50 US)

If you dont have one... get one!
 
Last edited by a moderator:
Rough Calculation Guide:

Here's some good info on ph.....
If your runoff pH is higher than your starting pH, use this equation to determine your soil pH:*
Soil pH = Runoff pH + Difference

If your runoff pH is lower than your starting pH, us this equation:
Soil pH = Runoff pH - Difference.

For example, say your the starting pH of your solution before it goes in is 6.5 and the pH of your runoff is 7.0. The difference is +0.5, so using the above equation:
Soil pH = 7.0 + 0.5*
Soil pH = 7.5

If your starting pH is 6.5 and your runoff is 6.0, your difference is -0.5 and using the above equation:
Soil pH = 6.0 - 0.5
Soil pH = 5.5


- This piece contributed by Goauto6 :thumbs: :clap:
 
Last edited by a moderator:
Last edited:
The effect of temperature is often overlooked when measuring the pH of your feed solution. The gray bar on the chart below shows that a neutral pH of 7 can only be established at a temperature of 77 degrees fahrenheit, 25 celsius. As the water temperature drops, the pH goes up, temperature rises, pH goes down. In the summer I use rain water right out of a barrel. When temperatures are high my water may get as warm as 85 degrees or more, enough to throw the pH off by almost .1. In the winter I bring jugs indoors to keep them warmer. They end up about 68 degrees, lowering the pH by about .1. While that doesn't seem like much, when you consider that the optimum pH range for growing weed is pretty narrow, 6.3 - 6.5, it could have an impact. Take this into consideration if you are using a pH meter without automatic temperature compensation.

If you are using a soil probe, your soil temperature will likely be a bit below room temperature. To get accurate readings it's best to also use a soil thermometer in conjunction with your soil probe.


141716d1351624866-ph-potential-hydrogen-manual-polled-phtemp.jpg
 

Attachments

  • phtemp.jpg
    phtemp.jpg
    34.6 KB · Views: 1,198
Last edited by a moderator:
  • Like
Reactions: JM
I've opened this thread and poll... I think we've covered pretty much everything PH wise here...

might as well let everyone enjoy the thread.. :smokeit:
 
Back
Top