I managed to replace the rez last night in about an hour and a half.
The previous rez was always a little weak, and I worried how long it would last.
The new rez is much more beefy, and feels like it should last a long time.
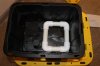
So the first thing I did was cut holes in the lid of the rez. The 2 big round holes are for the ebb and flow fittings. The smaller hole is where the pump cord will go through.
The largest cutout is so I have a space to check pH/EC and add/remove water (use a shop vac to empty rez, dump water in with a bucket to fill it).
View attachment 1096102
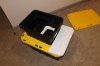
I cut up another lid I wasn't using so I'd have a cover for the large cutout area so that water doesn't evaporate too rapidly:
View attachment 1096103
The flood chamber is a 5 gallon storage tote and will sit on top of the rez like this (see how the holes line up):
View attachment 1096104
After I put the ebb and flow fittings into the flood chamber:
View attachment 1096106
If you are not familiar with the fittings, the one on the left is a drain at ground level that the pump pushes water up through.
The fitting on the right is a taller fitting, with a larger drain size. This determines the flood height.
Here you can see that the caps for the fittings on the bottom of the chamber are pretty large, and that's why I needed large holes in the rez lid:
View attachment 1096105
Everything lined up OK, and the flood chamber sits on the rez nice and flat and I still have room for the large cutout so I can pH etc:
View attachment 1096107
One last thing needs to go into the flood chamber, a stilt of sorts to keep the pot off the ground so that roots don't grow into the chamber.
I made this one out of 1 inch pvc and 4 fittings. The pot will sit directly on this:
View attachment 1096108
I put the pump inside the rez with a small piece of tubing, and connected the tubing to the small fitting. Here it is all finished:
View attachment 1096110
When I put it in the tent, I have a cover for the flood chamber. This prevents algae from growing on the floor of the chamber where some water is left after a flood:
View attachment 1096112
You can see it is cut down the middle so I can take it off easily without disturbing the plant.
Here you can see how I would access the rez with the rez cover off:
View attachment 1096113
One of the cool things about this system is I can take the plant out for training/pictures at any time:
View attachment 1096101
She is just in a bucket filled with hydroton that has holes drilled in the bottom.
So, on a side note, I'm glad I took this all apart and put it back together. I was using a smaller stilt last time and the pot was not high enough off the ground....
So roots were growing out of it into the flood chamber. I trimmed these roots off, and I hope that doesn't trigger flowering... that would suck LOL, but I'm glad I caught it early(ish). She was definitely a little wonky this morning, but she has since recovered. Let's hope the root stress was not enough to put her into flower mode while she is only a baby.