Explanation of Shallow Water Culture.
EDIT: Completed Grows Here => https://www.autoflower.org/forums/t...ntastic-perpetual-shallow-water-culture.83296
After being inundated with many requests (two) for an elucidation on the Shallow Water Culture technique... here it is...
Of all the hundreds of hydro set ups I've seen for some reason I do not see this type of set up, and by 'type' I do not mean something exactly like mine, but something that combines the best bits of various hydro techniques. Because hydroponic is so versatile, it's pretty easy to do it in multiple ways and one of the easiest and most reliable methods is a deep water culture, this has advantages over an inert substance hydro and it also has disadvantages. I have sought to look at all the pros and cons of various hydro set ups and take the best bits from each. In so doing I have come up with what I reckon is the perfect set up for combining ease of use and elimination of potential problems and I am now going to explain the principles that I work with.
I call this Shallow Water Culture specifically to differentiate it from the DWC because it's precisely the D in DWC that is the source of most of the problems. The most obvious problem is that in a DWC we have a relatively small reservoir which the roots occupy along with the pump. It doesn't have to be like this but it is. The main problems are ...
1.Roots become entangled with the pump, not in a quantum mechanical way, just the normal roots in the pump way.
2. Roots can drown due to lack of oxygen, so introduction of extra air is necessary.
3. Adjusting the reservoir and/or changing the reservoir is a pain in the ass for numerous reasons.
4. A relatively small reservoir can easily cause an over concentration due to evaporation, very quickly.
5. The extra work involved can cause the grower to slack off a bit which can sap the enjoyment of growing
I will now explain how a Shallow Water Culture solves all these problems.
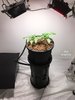
First of all the plant starts off in Expanded Clay, however not in a tiny net pot but instead a rather substantial quantity of substrate. I like to use a 16 litre pot filled to the top with Expanded Clay. The pots I use is 11" across the top and 11" deep and top fed with a ring, or whatever shape suits. The first advantage of this is that Expanded Clay itself has a very large micro surface, and in a pot the size that I use, it creates a big opportunity for air to be sucked in. This eliminates any need to even think about air stones or lack of air or suffocating the roots. This would normally be referred to as an inert hydro grow. So where does the Shallow in SWC come from? The next part.
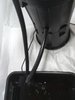
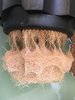
The next bit is not necessary but while it serves some slightly different functionality it is also built in redundancy that adds the advantage of a DWC to an inert media grow. The main pot is fully enclosed in another bucket and is held off the bottom somehow so the top tub drains out the bottom into the enclosing bucket which has an overflow about 2" off the bottom which then either drains into the reservoir that it is sitting on or what I prefer is that it drains into an external reservoir that is not underneath the main pots, the reason for this is that it's much easier to get to and is completely isolated from the 2" pool of nutrient, this is the shallow part of the Shallow Water Culture, which is completely isolated from not only the reservoir but also the pump. So you can easily see how each one of the normal 'cons' of a DWC is eliminated. I like to leave some air space above the shallow pool that quickly fills with roots that are also exposed directly to air. A properly set up Shallow Water Culture is two separate and redundant systems in one.
How deep you want the Shallow part to be is up to you. I'm happy with 2 inches but if you have the vertical height you could in theory make it as deep as you want without any of the problems of normal DWC.
You could also have a few pots all draining into a 100L (or more) reservoir, however I prefer to have a small dedicated reservoir for each pot. This is ideally suited to no tent, or a large tent. for a normal tent probably two separate pots with the reservoir outside the tent might work. Or even one single pot with the reservoir inside the tent is good because you can grow two or even three plants in one shallow water culture set up which can easily fill a normal size tent. Autos are made for all these variations, I think photo periods work well but are completely unnecessary as you begin to introduce complications that you just do not need. You can get just as big a result from autos. This type of set up is ideal for bringing out the full possibilities inherent in the automatic flowering concept.
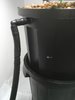
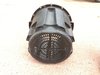
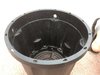
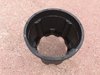
Below I will illustrate what I use and recommend, which is the Nutrifield Pro Pot system. I just use their pot with holes in the bottom and their pot that is exactly the same but solid on the bottom. I also use their pot that looks similar but has not bottom and is used simply as a stand. The stand is not necessary you can use a milk crate as the stand but I like using their pot stand because it's compact and it's easy to spin the top enclosing pot around without it falling off. And it's only a few dollars.
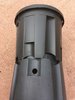
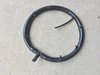
The two main pots fit inside each other in various ways, by turning the pot 30 degrees the top pot can sit close to the bottom or it can sit much higher up. There are no holes so you can insert your drain or feeding holes wherever you like. I have the top pot filled with the Clay Balls, sitting fairly low, and I drill a hole about two inches off the bottom, so I use 22mm hose to drain. But I only use 16mm hose to irrigate, this mitigates any chance of flooding.
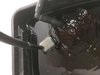
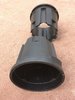
The Nutrifield pots have a top that top feeds, which doesn't work for me, I prefer to fashion a top feeder with 16mm tubing with screw in jets which are angled to distribute the nutrient. As you see you can also attach smaller tubes to the jets to focus on seedlings that are installed in EazyPlugs, which work very well in this system.
After being inundated with many requests (two) for an elucidation on the Shallow Water Culture technique... here it is...
Of all the hundreds of hydro set ups I've seen for some reason I do not see this type of set up, and by 'type' I do not mean something exactly like mine, but something that combines the best bits of various hydro techniques. Because hydroponic is so versatile, it's pretty easy to do it in multiple ways and one of the easiest and most reliable methods is a deep water culture, this has advantages over an inert substance hydro and it also has disadvantages. I have sought to look at all the pros and cons of various hydro set ups and take the best bits from each. In so doing I have come up with what I reckon is the perfect set up for combining ease of use and elimination of potential problems and I am now going to explain the principles that I work with.
I call this Shallow Water Culture specifically to differentiate it from the DWC because it's precisely the D in DWC that is the source of most of the problems. The most obvious problem is that in a DWC we have a relatively small reservoir which the roots occupy along with the pump. It doesn't have to be like this but it is. The main problems are ...
1.Roots become entangled with the pump, not in a quantum mechanical way, just the normal roots in the pump way.
2. Roots can drown due to lack of oxygen, so introduction of extra air is necessary.
3. Adjusting the reservoir and/or changing the reservoir is a pain in the ass for numerous reasons.
4. A relatively small reservoir can easily cause an over concentration due to evaporation, very quickly.
5. The extra work involved can cause the grower to slack off a bit which can sap the enjoyment of growing
I will now explain how a Shallow Water Culture solves all these problems.
First of all the plant starts off in Expanded Clay, however not in a tiny net pot but instead a rather substantial quantity of substrate. I like to use a 16 litre pot filled to the top with Expanded Clay. The pots I use is 11" across the top and 11" deep and top fed with a ring, or whatever shape suits. The first advantage of this is that Expanded Clay itself has a very large micro surface, and in a pot the size that I use, it creates a big opportunity for air to be sucked in. This eliminates any need to even think about air stones or lack of air or suffocating the roots. This would normally be referred to as an inert hydro grow. So where does the Shallow in SWC come from? The next part.
The next bit is not necessary but while it serves some slightly different functionality it is also built in redundancy that adds the advantage of a DWC to an inert media grow. The main pot is fully enclosed in another bucket and is held off the bottom somehow so the top tub drains out the bottom into the enclosing bucket which has an overflow about 2" off the bottom which then either drains into the reservoir that it is sitting on or what I prefer is that it drains into an external reservoir that is not underneath the main pots, the reason for this is that it's much easier to get to and is completely isolated from the 2" pool of nutrient, this is the shallow part of the Shallow Water Culture, which is completely isolated from not only the reservoir but also the pump. So you can easily see how each one of the normal 'cons' of a DWC is eliminated. I like to leave some air space above the shallow pool that quickly fills with roots that are also exposed directly to air. A properly set up Shallow Water Culture is two separate and redundant systems in one.
How deep you want the Shallow part to be is up to you. I'm happy with 2 inches but if you have the vertical height you could in theory make it as deep as you want without any of the problems of normal DWC.
You could also have a few pots all draining into a 100L (or more) reservoir, however I prefer to have a small dedicated reservoir for each pot. This is ideally suited to no tent, or a large tent. for a normal tent probably two separate pots with the reservoir outside the tent might work. Or even one single pot with the reservoir inside the tent is good because you can grow two or even three plants in one shallow water culture set up which can easily fill a normal size tent. Autos are made for all these variations, I think photo periods work well but are completely unnecessary as you begin to introduce complications that you just do not need. You can get just as big a result from autos. This type of set up is ideal for bringing out the full possibilities inherent in the automatic flowering concept.
Below I will illustrate what I use and recommend, which is the Nutrifield Pro Pot system. I just use their pot with holes in the bottom and their pot that is exactly the same but solid on the bottom. I also use their pot that looks similar but has not bottom and is used simply as a stand. The stand is not necessary you can use a milk crate as the stand but I like using their pot stand because it's compact and it's easy to spin the top enclosing pot around without it falling off. And it's only a few dollars.
The two main pots fit inside each other in various ways, by turning the pot 30 degrees the top pot can sit close to the bottom or it can sit much higher up. There are no holes so you can insert your drain or feeding holes wherever you like. I have the top pot filled with the Clay Balls, sitting fairly low, and I drill a hole about two inches off the bottom, so I use 22mm hose to drain. But I only use 16mm hose to irrigate, this mitigates any chance of flooding.
The Nutrifield pots have a top that top feeds, which doesn't work for me, I prefer to fashion a top feeder with 16mm tubing with screw in jets which are angled to distribute the nutrient. As you see you can also attach smaller tubes to the jets to focus on seedlings that are installed in EazyPlugs, which work very well in this system.