- Joined
- Sep 1, 2014
- Messages
- 13,081
- Reputation
- 5,396
- Reaction score
- 46,429
- Points
- 0
- Currently Smoking
- yo arse
Hello fellow AFNer's
Recently a member asked a question and I replied to it in in my best capacity.
There a section I used information from the interweb such as the "Soil Texture" info and Subcool's Super soil recipe (I mention this, where relevant).
The rest i wrote on the fly & there maybe something's i missed, here and there but for the most part, I think it answers the question.
Additional information on anything missing, can be added if you would like to share it here, or you can start a new thread, easy vibes either way!
Keep it friendly, keep it friendly & keep AFN!
@Mañ'O'Green here's the sticky for you <<< Feel free to delete this line after!
So to the question at hand
Newgrow31 asked -
On another site I was reading a thread, I think it was titled "How to be successful every time" or something like that.
The thread was claiming that, he only used soil and worm castings for the whole grow & only watering when needed.
Can just worm castings added to soil, provide enough to keep a plant healthy.
(edited for constancy)
Arty's reply
It depends on the make up of of the soil.
In dry arid areas such as desserts, with scrubby vegetation, hot sun, little rain and strong winds, the soil is likely to be lacking in humus (no not the chickpea spread), humus is well rotted plant matter.These soils may have some mineral content but lack water retention & organic matter.
In a tropical rainforest, the soil will likely be very deep and rich but lacking in aggregates to aid drainage, oxygenation but jam packed with humus, and micro herds of beneficial bacteria and mycorrhizal fungi.
clay soil are rich in nutrients and moisture but are lacking in oxygen for a good root system and can tend to get waterlogged in wet weather.
What you want is a good free draining loamy soil, see the chart below for the make up of "Loam".
Here is a soil texture chart all soils will be a mix of the various components of the chat.

This next bit is from Wikipedia and tells you about the various soil textures in the chart above.
Classification
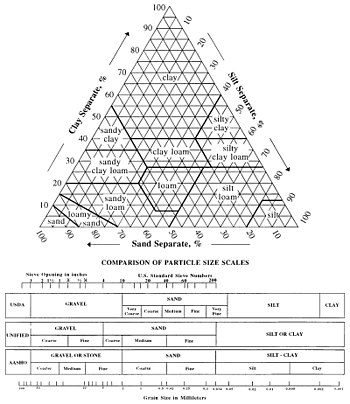
Soil texture triangle, showing the 12 major textural classes, and particle size scales as defined by the USDA.
In the United States, twelve major soil texture classifications are defined by the United States Department of Agriculture.[1] The twelve classifications are sand, loamy sand, sandy loam, loam, silt loam, silt, sandy clay loam, clay loam, silty clay loam, sandy clay, silty clay, and clay.[5] Soil textures are classified by the fractions of each soil separate (sand, silt, and clay) present in a soil. Classifications are typically named for the primary constituent particle size or a combination of the most abundant particles sizes, e.g. "sandy clay" or "silty clay". A fourth term, loam, is used to describe equal properties of sand, silt, and clay in a soil sample, and lends to the naming of even more classifications, e.g. "clay loam" or "silt loam".
Determining soil texture is often aided with the use of a soil texture triangle.[5] An example of a soil triangle is found on the right side of the page. One side of the triangle represents percent sand, the second side represents percent clay, and the third side represents percent silt. If the percentages of sand, clay, and silt in the soil sample are known, then the triangle can be used to determine the soil texture classification. For example, if a soil is 70 percent sand and 10 percent clay then the soil is classified as a sandy loam. The same method can be used starting on any side of the soil triangle. If the texture by feel method was used to determine the soil type, the triangle can also provide a rough estimate on the percentages of sand, silt, and clay in the soil.
Chemical and physical properties of a soil are related to texture. Particle size and distribution will affect a soil's capacity for holding water and nutrients. Fine textured soils generally have a higher capacity for water retention, whereas sandy soils contain large pore spaces that allow leaching.[6]
Soil separates
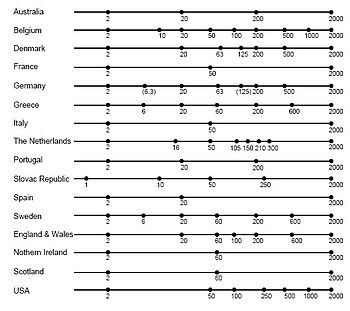
Particle size classifications used by different countries, diameters in μm
Soil separates are specific ranges of particle sizes. The smallest particles are clay particles and are classified as having diameters of less than 0.002 mm. Clay particles are plate-shaped instead of spherical, allowing for an increased specific surface area.[7] The next smallest particles are silt particles and have diameters between 0.002 mm and 0.05 mm (in USDA soil taxonomy). The largest particles are sand particles and are larger than 0.05 mm in diameter. Furthermore, large sand particles can be described as coarse, intermediate as medium, and the smaller as fine. Other countries have their own particle size classifications.
Methodology[edit]
Texture by feel[edit]
Texture by feel flow chart
Hand analysis is a simple and effective means to rapidly assess and classify a soil's physical condition. Correctly executed, the procedure allows for rapid and frequent assessment of soil characteristics with little or no equipment. It is thus a useful tool for identifying spatial variation both within and between fields as well as identifying progressive changes and boundaries between soil map units (soil series). Texture by feel is a qualitative method, as it does not provide exact values of sand, silt, and clay. Although qualitative, the texture by feel flowchart can be an accurate way for a scientist or interested individual to analyze the relative proportions of sand, silt, and clay.[8]
The texture by feel method involves taking a small sample of soil and making a ribbon. A ribbon can be made by taking a ball of soil and pushing the soil between the thumb and forefinger and squeezing it upward into a ribbon. Allow the ribbon to emerge and extend over the forefinger, breaking from its own weight. Measuring the length of the ribbon can help determine the amount of clay in the sample. After making a ribbon, excessively wet a small pinch of soil in the palm of the hand and rub in with the forefinger to determine the amount of sand in the sample. Soils that have a high percentage of sand, such as sandy loam or sandy clay, have a gritty texture.[1] Soils that have a high percentage of silt, such as silty loam or silty clay, feel smooth.[1] Soils that have a high percentage of clay, such as clay loam, have a sticky feel. Although the texture by feel method takes practice, it is a useful way to determine soil texture, especially in the field.
Hydrometer Method[edit]
The hydrometer method of determining soil texture is a quantitative measurement providing estimates of the percent sand, clay, and silt in the soil.[9] The hydrometer method was developed in 1927[10] and is still widely used today. This method requires the use of sodium hexametaphsophate, which acts as a dispersing agent to separate soil aggregates. The soil is mixed with the sodium hexametaphosphate solution on an orbital shaker overnight. The solution is transferred to one liter graduated cylinders and filled with water. The soil solution is mixed with a metal plunger to disperse the soil particles.[9] The soil particles separate based on size and sink to the bottom. Sand particles sink to the bottom of the cylinder first. Silt particles sink to the bottom of the cylinder after the sand. Clay particles separate out above the silt layer.
Measurements are taken using a soil hydrometer. A soil hydrometer measures the relative density of liquids (density of a liquid compared to the density of water). The hydrometer is lowered into the cylinder containing the soil mixture at different times, forty-five seconds to measure sand content, one and a half hours to measure silt content and between six and twenty-four hours (depending on the protocol used) to measure clay. The number on the hydrometer that is visible (above the soil solution) is recorded.[9] A blank (containing only water and the dispersing agent) is used to calibrate the hydrometer. The values recorded from the readings are used to calculate the percent clay, silt and sand. The blank is subtracted from each of the three readings. The calculations are as follows:[9]
Percent silt = (dried mass of soil – sand hydrometer reading – blank reading) / (dried mass of soil) *100
Percent clay = (clay hydrometer reading – blank reading) / (dried mass of soil) *100
Percent sand = 100 – (percent clay + percent silt)
Additional Methods
There are several additional quantitative methods to determine soil texture. Some examples of these methods are the pipette method, the particulate organic matter (POM) method, and the rapid method
Then there is "Supersoil"
“Super soil” is a term that started being used widely after a famous cannabis grower known as Subcool released a specific set of instructions for creating composted soil that delivers everything your cannabis plant needs, at exactly the right time, without needing to manage your pH or add extra nutrients.
(This next bit is copied from high times)
The Base You - can reduce the quantities of the ingredient to make smaller batches, just keep the ratio the of the ingredients the same.
Start with at least six to eight large bags of high-quality organic soil. This is your base soil—i.e., your regular potting soil without the additives. The selection of your base soil is very important, so don’t cut corners here. I can’t begin to discuss all the different products out there, but I will mention a few in this article. A good organic soil should cost you from $8 to $10 per 30-pound bag. Since I want to give you a very specific idea of what I consider to be a balanced soil, take a look at the ingredients in a product called Roots Organic:
Lignite, coco fiber, perlite, pumice, compost, peat moss, bone meal, bat guano, kelp meal, greensand, soybean meal, leonardite, k-mag, glacial rock dust, alfalfa meal, oyster shell flour, earthworm castings and mycorrhizae.
Another local product we’re trying out now, Harvest Moon, has the following ingredients:
Washed coco fibers, Alaskan peat moss, perlite, yucca, pumice, diatoms, worm castings, feather meal, fishmeal, kelp meal, limestone, gypsum, soybean meal, alfalfa meal, rock dust, yucca meal and mycorrhizae fungi.
So far we’ve found that Roots Organic produces a more floral smell in the finished buds, while Harvest Moon generates larger yields.
If you have access to a good local mix like these, then I highly recommend starting with a product of this type. We’ve also had decent results using commercial brands, but never “as is.” The best results we’ve had to date using a well-known commercial soil has been with Fox Farms’ Ocean Forest soil combined in a 2-to-1 ratio with Light Warrior. Used on its own, Ocean Forest is known for burning plants and having the wrong ratio of nutrients, but when cut with Light Warrior, it makes a pretty good base-soil mix.
You can also just use two bales of Sunshine Mix #4, but this would be my last choice, since plants grown in this mix may not respond well to my “just add water” method of growing.
After choosing your base soil, the Super Soil concentrate is placed in the bottom one-third to one-half of the container and blended with the base soil. (With strains that require high levels of nutrients, we’ll go so far as to fill ¾ of the container with Super Soil, but this is necessary only with a small percentage of strains.) This allows the plants to grow into the concentrated Super Soil layer, which means that in the right size container, they’ll need nothing but water throughout their full cycle. One of the things I like best about this soil mix is that I can drop off plants with patients, and all they have to do is water them when the soil dries out.
Stir It Up
There are several ways to mix these ingredients well. You can sweep up a patio or garage and work there on a tarp, or you can use a plastic wading pool for kids. (These cost about 10 bucks apiece and work really well for a few seasons.) Some growers have been known to rent a cement mixer to cut down on the physical labor. Whatever method you use, all that matters in the end is that you get the ingredients mixed properly.
This can be a lot of work, so be careful not to pull a muscle if you’re not used to strenuous activity. On the other hand, the physical effort involved is good for mind and body, and working with soil has kept me in pretty good shape. But if you have physical limitations, you can simply have someone mix it up for you while you supervise. As far as the proper steps go: Pour a few bags of base soil into your mixing container first, making a mound. Then pour the powdered nutrients in a circle around the mound and cover everything with another bag of base soil. In goes the bat poop and then more base soil. I continue this process of layering soil and additives until everything has been added to the pile.
Now I put on my muck boots, which help me kick the soil around and get it mixed up well using my larger and stronger leg muscles instead of my arms. The rest is simple; as my skipper used to say, “Put your back into it.” This is hard work that I obsess over, even breaking up all the soil clods by hand. I work on the pile for at least 15 minutes, turning the soil over and over until it’s thoroughly mixed.
Then I store my Super Soil in large garbage cans. (And before using any of it, I pour the entire load out and mix it well once more.) Once it’s placed in the cans, I water it slightly—adding three gallons of water to each large garbage can’s worth. Though it makes stirring the soil harder, adding water will activate the mycorrhizae and help all the powders dissolve.
Before Planting
So we’ve added the water, and now we let it cook in the sunshine—30 days is best for this concentrate. Do not put seeds or clones directly into this Super Soil mix or they will burn. This is an advanced recipe to be used in conjunction with base soil. First you place a layer of Super Soil at the bottom of each finishing container; then you layer a bed of base soil on top of the Super Soil concentrate; and then you transplant your fully rooted, established clones into the bed of base soil. As the plants grow, they’ll slowly push their roots through the base soil and into the Super Soil, drawing up all the nutrients they need for a full life cycle. The Super Soil can be also be used to top-dress plants that take longer to mature. I’ll use this mix for a full year.
Buds grown with this method finish with a fade and a smoother, fruitier flavor. The plants aren’t green at harvest time, but rather purple, red, orange, even black—plus the resin content is heavier, and the terpenes always seem more pungent. This method is now being used by medical growers all over the world, and with amazing results. The feedback I’ve received is really positive, including reports of hydro-like growth and novice growers producing buds of the same high quality as lifelong cultivators. So give it a try! You won’t be disappointed.
The Mix
Here are the amounts we’ve found will produce the best-tasting buds and strongest medicines:
So can a cannabis plant live on soil alone, most certainly yes, that's how they live and survive in the wild!
The soil needs to contain sufficient nutrients for the plant needs, there needs to be adequate air to the roots, there also needs to be sufficient moisture for the plant to take up.
Give it the wrong soil and you may get absolutely nowhere and the plant will die or have issues.
In order to use the correct soil we must know what sort of soil cannabis needs and what nutrients it need to contain for correct feeding requirements and the correct Ph.
Cannabis likes a soil with good oxygenation, decent moisture retention but never waterlogged & a Ph of 6-7 Ph in soil.
Different strains like different amounts of nutrients but a decent soil will have everything it needs (there are threads on the organic nutrient demands of cannabis).
Soil differs from that of the various substrates used in a hydro set up, by the fact that soil naturally buffer the nutrients, allowing for a slow release of nutrients to the plant.
https://www.facebook.com/sharer.php?u=https://hightimes.com/grow/subcools-super-soil-step-by-step/
Recently a member asked a question and I replied to it in in my best capacity.
There a section I used information from the interweb such as the "Soil Texture" info and Subcool's Super soil recipe (I mention this, where relevant).
The rest i wrote on the fly & there maybe something's i missed, here and there but for the most part, I think it answers the question.
Additional information on anything missing, can be added if you would like to share it here, or you can start a new thread, easy vibes either way!
Keep it friendly, keep it friendly & keep AFN!
@Mañ'O'Green here's the sticky for you <<< Feel free to delete this line after!
So to the question at hand
Newgrow31 asked -
On another site I was reading a thread, I think it was titled "How to be successful every time" or something like that.
The thread was claiming that, he only used soil and worm castings for the whole grow & only watering when needed.
Can just worm castings added to soil, provide enough to keep a plant healthy.
(edited for constancy)
Arty's reply
It depends on the make up of of the soil.
In dry arid areas such as desserts, with scrubby vegetation, hot sun, little rain and strong winds, the soil is likely to be lacking in humus (no not the chickpea spread), humus is well rotted plant matter.These soils may have some mineral content but lack water retention & organic matter.
In a tropical rainforest, the soil will likely be very deep and rich but lacking in aggregates to aid drainage, oxygenation but jam packed with humus, and micro herds of beneficial bacteria and mycorrhizal fungi.
clay soil are rich in nutrients and moisture but are lacking in oxygen for a good root system and can tend to get waterlogged in wet weather.
What you want is a good free draining loamy soil, see the chart below for the make up of "Loam".
Here is a soil texture chart all soils will be a mix of the various components of the chat.
This next bit is from Wikipedia and tells you about the various soil textures in the chart above.
Classification

Soil texture triangle, showing the 12 major textural classes, and particle size scales as defined by the USDA.
In the United States, twelve major soil texture classifications are defined by the United States Department of Agriculture.[1] The twelve classifications are sand, loamy sand, sandy loam, loam, silt loam, silt, sandy clay loam, clay loam, silty clay loam, sandy clay, silty clay, and clay.[5] Soil textures are classified by the fractions of each soil separate (sand, silt, and clay) present in a soil. Classifications are typically named for the primary constituent particle size or a combination of the most abundant particles sizes, e.g. "sandy clay" or "silty clay". A fourth term, loam, is used to describe equal properties of sand, silt, and clay in a soil sample, and lends to the naming of even more classifications, e.g. "clay loam" or "silt loam".
Determining soil texture is often aided with the use of a soil texture triangle.[5] An example of a soil triangle is found on the right side of the page. One side of the triangle represents percent sand, the second side represents percent clay, and the third side represents percent silt. If the percentages of sand, clay, and silt in the soil sample are known, then the triangle can be used to determine the soil texture classification. For example, if a soil is 70 percent sand and 10 percent clay then the soil is classified as a sandy loam. The same method can be used starting on any side of the soil triangle. If the texture by feel method was used to determine the soil type, the triangle can also provide a rough estimate on the percentages of sand, silt, and clay in the soil.
Chemical and physical properties of a soil are related to texture. Particle size and distribution will affect a soil's capacity for holding water and nutrients. Fine textured soils generally have a higher capacity for water retention, whereas sandy soils contain large pore spaces that allow leaching.[6]
Soil separates

Particle size classifications used by different countries, diameters in μm
Soil separates are specific ranges of particle sizes. The smallest particles are clay particles and are classified as having diameters of less than 0.002 mm. Clay particles are plate-shaped instead of spherical, allowing for an increased specific surface area.[7] The next smallest particles are silt particles and have diameters between 0.002 mm and 0.05 mm (in USDA soil taxonomy). The largest particles are sand particles and are larger than 0.05 mm in diameter. Furthermore, large sand particles can be described as coarse, intermediate as medium, and the smaller as fine. Other countries have their own particle size classifications.
| Name of soil separate | Diameter limits (mm) (USDA classification) | Diameter limits (mm) (WRB classification) |
|---|---|---|
| Clay | less than 0.002 | less than 0.002 |
| Silt | 0.002 – 0.05 | 0.002 – 0.063 |
| Very fine sand | 0.05 – 0.10 | 0.063 – 0.125 |
| Fine sand | 0.10 – 0.25 | 0.125 – 0.20 |
| Medium sand | 0.25 – 0.50 | 0.20 – 0.63 |
| Coarse sand | 0.50 – 1.00 | 0.63 – 1.25 |
| Very coarse sand | 1.00 – 2.00 | 1.25 – 2.00 |
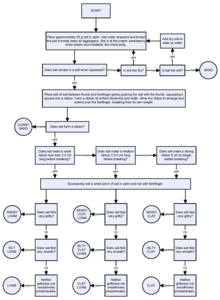
Texture by feel[edit]

Texture by feel flow chart
Hand analysis is a simple and effective means to rapidly assess and classify a soil's physical condition. Correctly executed, the procedure allows for rapid and frequent assessment of soil characteristics with little or no equipment. It is thus a useful tool for identifying spatial variation both within and between fields as well as identifying progressive changes and boundaries between soil map units (soil series). Texture by feel is a qualitative method, as it does not provide exact values of sand, silt, and clay. Although qualitative, the texture by feel flowchart can be an accurate way for a scientist or interested individual to analyze the relative proportions of sand, silt, and clay.[8]
The texture by feel method involves taking a small sample of soil and making a ribbon. A ribbon can be made by taking a ball of soil and pushing the soil between the thumb and forefinger and squeezing it upward into a ribbon. Allow the ribbon to emerge and extend over the forefinger, breaking from its own weight. Measuring the length of the ribbon can help determine the amount of clay in the sample. After making a ribbon, excessively wet a small pinch of soil in the palm of the hand and rub in with the forefinger to determine the amount of sand in the sample. Soils that have a high percentage of sand, such as sandy loam or sandy clay, have a gritty texture.[1] Soils that have a high percentage of silt, such as silty loam or silty clay, feel smooth.[1] Soils that have a high percentage of clay, such as clay loam, have a sticky feel. Although the texture by feel method takes practice, it is a useful way to determine soil texture, especially in the field.
Hydrometer Method[edit]
The hydrometer method of determining soil texture is a quantitative measurement providing estimates of the percent sand, clay, and silt in the soil.[9] The hydrometer method was developed in 1927[10] and is still widely used today. This method requires the use of sodium hexametaphsophate, which acts as a dispersing agent to separate soil aggregates. The soil is mixed with the sodium hexametaphosphate solution on an orbital shaker overnight. The solution is transferred to one liter graduated cylinders and filled with water. The soil solution is mixed with a metal plunger to disperse the soil particles.[9] The soil particles separate based on size and sink to the bottom. Sand particles sink to the bottom of the cylinder first. Silt particles sink to the bottom of the cylinder after the sand. Clay particles separate out above the silt layer.
Measurements are taken using a soil hydrometer. A soil hydrometer measures the relative density of liquids (density of a liquid compared to the density of water). The hydrometer is lowered into the cylinder containing the soil mixture at different times, forty-five seconds to measure sand content, one and a half hours to measure silt content and between six and twenty-four hours (depending on the protocol used) to measure clay. The number on the hydrometer that is visible (above the soil solution) is recorded.[9] A blank (containing only water and the dispersing agent) is used to calibrate the hydrometer. The values recorded from the readings are used to calculate the percent clay, silt and sand. The blank is subtracted from each of the three readings. The calculations are as follows:[9]
Percent silt = (dried mass of soil – sand hydrometer reading – blank reading) / (dried mass of soil) *100
Percent clay = (clay hydrometer reading – blank reading) / (dried mass of soil) *100
Percent sand = 100 – (percent clay + percent silt)
Additional Methods
There are several additional quantitative methods to determine soil texture. Some examples of these methods are the pipette method, the particulate organic matter (POM) method, and the rapid method
Then there is "Supersoil"
“Super soil” is a term that started being used widely after a famous cannabis grower known as Subcool released a specific set of instructions for creating composted soil that delivers everything your cannabis plant needs, at exactly the right time, without needing to manage your pH or add extra nutrients.
(This next bit is copied from high times)
The Base You - can reduce the quantities of the ingredient to make smaller batches, just keep the ratio the of the ingredients the same.
Start with at least six to eight large bags of high-quality organic soil. This is your base soil—i.e., your regular potting soil without the additives. The selection of your base soil is very important, so don’t cut corners here. I can’t begin to discuss all the different products out there, but I will mention a few in this article. A good organic soil should cost you from $8 to $10 per 30-pound bag. Since I want to give you a very specific idea of what I consider to be a balanced soil, take a look at the ingredients in a product called Roots Organic:
Lignite, coco fiber, perlite, pumice, compost, peat moss, bone meal, bat guano, kelp meal, greensand, soybean meal, leonardite, k-mag, glacial rock dust, alfalfa meal, oyster shell flour, earthworm castings and mycorrhizae.
Another local product we’re trying out now, Harvest Moon, has the following ingredients:
Washed coco fibers, Alaskan peat moss, perlite, yucca, pumice, diatoms, worm castings, feather meal, fishmeal, kelp meal, limestone, gypsum, soybean meal, alfalfa meal, rock dust, yucca meal and mycorrhizae fungi.
So far we’ve found that Roots Organic produces a more floral smell in the finished buds, while Harvest Moon generates larger yields.
If you have access to a good local mix like these, then I highly recommend starting with a product of this type. We’ve also had decent results using commercial brands, but never “as is.” The best results we’ve had to date using a well-known commercial soil has been with Fox Farms’ Ocean Forest soil combined in a 2-to-1 ratio with Light Warrior. Used on its own, Ocean Forest is known for burning plants and having the wrong ratio of nutrients, but when cut with Light Warrior, it makes a pretty good base-soil mix.
You can also just use two bales of Sunshine Mix #4, but this would be my last choice, since plants grown in this mix may not respond well to my “just add water” method of growing.
After choosing your base soil, the Super Soil concentrate is placed in the bottom one-third to one-half of the container and blended with the base soil. (With strains that require high levels of nutrients, we’ll go so far as to fill ¾ of the container with Super Soil, but this is necessary only with a small percentage of strains.) This allows the plants to grow into the concentrated Super Soil layer, which means that in the right size container, they’ll need nothing but water throughout their full cycle. One of the things I like best about this soil mix is that I can drop off plants with patients, and all they have to do is water them when the soil dries out.
Stir It Up
There are several ways to mix these ingredients well. You can sweep up a patio or garage and work there on a tarp, or you can use a plastic wading pool for kids. (These cost about 10 bucks apiece and work really well for a few seasons.) Some growers have been known to rent a cement mixer to cut down on the physical labor. Whatever method you use, all that matters in the end is that you get the ingredients mixed properly.
This can be a lot of work, so be careful not to pull a muscle if you’re not used to strenuous activity. On the other hand, the physical effort involved is good for mind and body, and working with soil has kept me in pretty good shape. But if you have physical limitations, you can simply have someone mix it up for you while you supervise. As far as the proper steps go: Pour a few bags of base soil into your mixing container first, making a mound. Then pour the powdered nutrients in a circle around the mound and cover everything with another bag of base soil. In goes the bat poop and then more base soil. I continue this process of layering soil and additives until everything has been added to the pile.
Now I put on my muck boots, which help me kick the soil around and get it mixed up well using my larger and stronger leg muscles instead of my arms. The rest is simple; as my skipper used to say, “Put your back into it.” This is hard work that I obsess over, even breaking up all the soil clods by hand. I work on the pile for at least 15 minutes, turning the soil over and over until it’s thoroughly mixed.
Then I store my Super Soil in large garbage cans. (And before using any of it, I pour the entire load out and mix it well once more.) Once it’s placed in the cans, I water it slightly—adding three gallons of water to each large garbage can’s worth. Though it makes stirring the soil harder, adding water will activate the mycorrhizae and help all the powders dissolve.
Before Planting
So we’ve added the water, and now we let it cook in the sunshine—30 days is best for this concentrate. Do not put seeds or clones directly into this Super Soil mix or they will burn. This is an advanced recipe to be used in conjunction with base soil. First you place a layer of Super Soil at the bottom of each finishing container; then you layer a bed of base soil on top of the Super Soil concentrate; and then you transplant your fully rooted, established clones into the bed of base soil. As the plants grow, they’ll slowly push their roots through the base soil and into the Super Soil, drawing up all the nutrients they need for a full life cycle. The Super Soil can be also be used to top-dress plants that take longer to mature. I’ll use this mix for a full year.
Buds grown with this method finish with a fade and a smoother, fruitier flavor. The plants aren’t green at harvest time, but rather purple, red, orange, even black—plus the resin content is heavier, and the terpenes always seem more pungent. This method is now being used by medical growers all over the world, and with amazing results. The feedback I’ve received is really positive, including reports of hydro-like growth and novice growers producing buds of the same high quality as lifelong cultivators. So give it a try! You won’t be disappointed.
The Mix
Here are the amounts we’ve found will produce the best-tasting buds and strongest medicines:
- 8 large bags of a high-quality organic potting soil with coco fiber and mycorrhizae (i.e., your base soil)
- 25 to 50 lbs of organic worm castings
- 5 lbs steamed bone meal
- 5 lbs Bloom bat guano
- 5 lbs blood meal
- 3 lbs rock phosphate
- ¾ cup Epson salts
- ½ cup sweet lime (dolomite)
- ½ cup azomite (trace elements)
- 2 tbsp powdered humic acid
So can a cannabis plant live on soil alone, most certainly yes, that's how they live and survive in the wild!
The soil needs to contain sufficient nutrients for the plant needs, there needs to be adequate air to the roots, there also needs to be sufficient moisture for the plant to take up.
Give it the wrong soil and you may get absolutely nowhere and the plant will die or have issues.
In order to use the correct soil we must know what sort of soil cannabis needs and what nutrients it need to contain for correct feeding requirements and the correct Ph.
Cannabis likes a soil with good oxygenation, decent moisture retention but never waterlogged & a Ph of 6-7 Ph in soil.
Different strains like different amounts of nutrients but a decent soil will have everything it needs (there are threads on the organic nutrient demands of cannabis).
Soil differs from that of the various substrates used in a hydro set up, by the fact that soil naturally buffer the nutrients, allowing for a slow release of nutrients to the plant.
https://www.facebook.com/sharer.php?u=https://hightimes.com/grow/subcools-super-soil-step-by-step/
Last edited: