DIY DIY Timelapse Camera : Pi-Lapse

cheers vaporhaizer :)
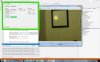
I think it was you that mentioned the pan/tilt some time ago and planted the idea in my head actually so thanks for that idea! I think its going to work out nice now as the arm will lower over the top of the pot when its small and I'll adjust the pan/tilt and move the bot back at regular intervals to give a smooth timelapse over the whole cycle.


gonna be fun waiting on the timelapse vids this thing should put out, will be good as I can collect a daily update vid from it every day :)


I'll be posting the scripts im building up for the pi later also, I figured better when they are in a fit and ready state.
 
Got the robot fully under control of the Raspberry Pi over the weekend. Arduino's USB is plugged into the Raspberry Pi, and so the Raspi makes use of the virtual serial over that.
I started with the simpler method of setting up the port with the STTY command and trying to simply send the command to the port echo "MV=1" >> /dev/ttyACM0 but that did not work so well.
Since the Arduino Mega 2560 board does a RESET when the DTR line on the serial is detected, the command from the raspi happens before the arduino has started up. After doing some reading I had to give up on that path. If DTR could be controlled by the Raspi, then the reset could be disabled, but it cant. There is another HW hack to stick a 120ohm resistor across a couple of pins on the arduino, but Im not in favour of that since I do want it to reset rather than run for 90 days (avoids issues which take longer to happen than Ive tested).
In the end the solution is quite tidy. I used python on the raspberry pi to send the command, it can open the port, wait for the arduino to startup and then send the command needed. I have a few scripts which can be called from the command line.
This one takes a value as an input parameter and sends it on to arduino. It will set the horizontal servo to a position.
-------------------
import sys
import serial
import time

commandString = "HS=" + sys.argv[1] + '\n'
print commandString
port = serial.Serial("/dev/ttyACM0", baudrate=9600, timeout=3.0)
time.sleep(1.5)
port.write(commandString)
-------------------
From the command line, its run like this ; python servoHS.py 1450
The servo will jump to that position about a second and a half later.
Similarly I have some scripts to handle the vertical servo and the forward/backward movement of the tank base. So it should be a case of some bash scripting between now and done, just syncing and setting the schedule of the periodic tasks, and some final testing :)
 
managed to settle down and get a good bit of progress with the project tonite!
Thinking about how to deploy the system easily, I put together a useful utility. It's a small PC application that connects to the Pi via SSH/Shell connection, over the network. So far I added a bunch of buttons that are all working now, making it easy to nudge the robot, move the camera arm, test the grow lighting, white lighting, flash LED... also just finished a pretty cool feature - to check the image that the Pi-Cam sees there is now a button for it. It takes a picture with the Pi-Cam and saves it to a temp file, then sucks that over the network onto the PC (via SSH/SCP) and opens it in the windows picture viewer. Just press, wait a few seconds while the progress bar goes, and the image pops up. Will be real useful to be able to do all this easily during setup, or even to log in and check the view to plan the next movements of the robot etc. Will save me untold amounts of typing out bash commands from memory im sure :)
Tomorrow will expand it more to be able to preview also the shots from the additional web cams. Also think about how it can be used to program the next few days movements, I figured it wont be a linear growth so this will allow me to track and adjust every few days along the grow.
 

Attachments

  • 31.jpg
    31.jpg
    49.6 KB · Views: 46
cheers steelrat!
nice link too, hadn't seen that one yet but could well be useful in future!
Yes, I think others struggled with this a little bit too, hence there are some shields etc that provide external pwm drivers.
There is lots of room to minimize the solution yet, a bigger MSP would have been able to do the job of the arduino and the 2 MSP430F2012's I used, put together. That would leave us with only the pi and an external control board.
To some extent it was what I had at hand and the time I could allocate to resolving a problem. plus I really wanted to try making a I2C slave device, I think that could be useful again!
cheers for the tip tho , and nice to have you aboard :)
 
thanks dude!
Had a little hiccup yesterday as the SD card in the Pi seems to have bombed out.
had to pick up another yesterday. Went for a Samsung 8GB this time and set it up using the NOOBS method. Old one was a Kingston pre-installed with Raspbian Wheezy, didn't expect it to fail already, prbly I will email the seller about that.
Good thing was I was able to follow along with my earlier posts last night and set the Pi up exactly the same again
id backed up my scripts a few days ago so nothing been lost and now im back at where I was.
 
sorry peeps been a few days, had a little time out and recharge also before starting on the next task, preparing somewhere to grow!
it wouldn't work in a cupboard so I had to free up a bit more space, this is about 1.2x1.2m and as high as the ceiling. Had to partition it out, seal it around and get the walls covered with diamond mylar. Also installed some flooring in silver to match so it looks quite tidy now and the robot has a nice surface to crawl back on.
Getting the electrics sorted out in the chamber, and tweaking the Robot a little more still, plan is to strap it into place in the next few days and make some initial tests to see the system works according to plan :)
 

Attachments

  • 32.jpg
    32.jpg
    38.1 KB · Views: 46
the failed SD card issue started to re-emerge yesterday and the new Samsung SD card got screwed as well and the pi wont boot
icon_e_sad.gif
Bit of a pain but again all the latest changes were backed up already so not too much grief.
led me to wonder why its having these issues, one suspect I had was power supply, if it doesn't hold up under the load and you get a low supply voltage during write operations, then the SD card can end with failed sectors. enough of those and the OS wont boot eventually. Googling around a bit I found some others have seen such issues with supply issues.
I rethought the power a little bit, taking off the capacitance I'dd added to the 5V rail (power supply turning off too slowly can also cause SD card issues), and removing the 5V feed from the control box. I also clipped the 5V red cable on the hub, so the Pi is on its own now, with a 3.5A 5V adaptor and high current mini-USB cable supplying it directly.

with this setup I've done some tests again on the old SANDisk card. Seems its too far gone, it keeps corrupting even after low level format and fresh install. develops issues quickly.
the Samsung on the other hand , showed only few errors on the original filesystem. After a low level format it seems to be operating well (im keeping an eye on it with fsck regularly)

so, hopefully cracked it this time.
just did something else to re-organise things for the better also ; got the OS running from the hard drive rather than SD. Now the SD is just there as it needs to be to redirect to the HD at bootup. this should help things also.
heres a very good instruction : http://raspberrypihobbyist.blogspot.co. ... drive.html

Also took an image of the SD card, so hopefully recovery in future will be quicker to do
icon_e_smile.gif

Its a fresh install again, so gonna take another day to get everything back where it should be.

Other than that things were looking good, about to start some tests. still , better it came up now than in a few weeks hey !!
 
What a pain about the SD cards :( I don't have a Pi so haven't joined any Pi forums yet, peripherals are power-sensitive are they, in general on the Pi ?


steely
 
Back
Top