Chester
Honey Hugger ...
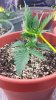
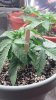
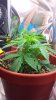
Chester...is it time to pony tail yet?
I know I would but bear in mind that it helps keep them short and don't pull them out of the ground in the process ...
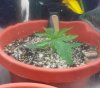
Chester...is it time to pony tail yet?
I know I would but bear in mind that it helps keep them short and don't pull them out of the ground in the process ...
Thank you all so much for chiming in. Money is tight (who does have unlimited funds?) so I will add other stuff later. I'll get the soil ph tester in a couple of weeks and another 125W 2700K light with the cord or several smaller watt bulbs to place around by the time we hit flower.
I do have 2 8 inch fans that I can use for air movement...maybe will add one of those and blow it AT the pc fan to help with air movement?
I think I might ditch the smart pots and go with regular - which I already have, I was up in the air about those.
I checked my city water quality report and there is chlorine but NO CHLORAMINE!!!! Ph is set to 7 at the factoryI did forget the ph tester for the water so will get that at the garden center when i buy the soil. I'll have to add ph up and down to my pre start list as well...this stuff will nickle and dime you to death..its worse than the kids!
I found this DIY CO2 thing in a book...what do you think?
1 gallon plastic water bottle with screw on lid
3 Cups of Sugar
A Funnel
1/ 4 inch diameter plastic tubing*
A drill with a 1/ 4 inch drill bit or a Philips head screw driver
Silicone sealant (comes in tubes for sealing bathroom stuff)
Procedure:
1. Fill your plastic gallon jug about half way with very warm (not hot) water.
2. Add 3 cups of sugar (using the funnel).
3. Put the lid tightly on the jug and shake it up to mix the sugar and warm water together.
4. Add cold water to the jug, leaving air space at the top (a couple of inches so the tube sticking out of the bottom of the cap is not in the water).
5. Add 2 tablespoons of baker’s yeast and a pinch of baking soda to the sugar water mixture.
6. Put the lid on and shake it again to mix it up.
7. Make a hole in the center of the water bottle cap that is 1/ 4 inch (or slightly smaller) using the drill or the screw driver.
8. Push the plastic tubing through the hole in the cap so that about 1 or 2 inches protrudes out of the underside of the cap, but not long enough for it to be in the water mix. It needs to be in the air inside the jug. Several feet of tubing should be sticking out of the top of the cap.
9. Seal the cap around the hole that the tubing is in, using the silicone tube.
10. Place the lid on the jug, screwing it down tightly. Make sure the tube is not immersed in water.
11. Run the tube that comes out of the top of your bottle into your grow area, pointing the opening toward the plants. Trim the tubing so it is only as long as you need to get from the plastic jug to your plants.
12. Be patient while the sugar water and yeast take time to react and put out CO2 gas. This CO2 generator should last about 2 weeks. You’ll need to clean the bottle and make a new batch of the sugar-water-yeast mixture if you want to go beyond two weeks.
Thats all for now...thanks again for the awesome welcome and advice.
Cheers!
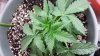
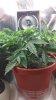
Hope you are ready for the ride man. Those Blues will start popping soon.
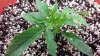
Looking good.
I'm having better results with the blower outside blowing into the intake, The room temp is 70F so its cooler than having the fan sucking in the heat of the cab. Opening it often to change bottles and having to cool everything again.