Indoor CDLC and Sour Stomper in Earth Boxes July 1 2022

terp182

Welcome to the CannaZone
Cultivators Club
Joined
Sep 13, 2020
Messages
283
Reputation
165
Reaction score
573
Points
0
Greetings! I'm back for another journal, this time documenting my first time trying EarthBoxes (or more specifically, a cheaper raised SIP from an Amazon competitor). While I prefer to work with autopots since I've been learning to grow on those, my current setup doesn't leave me room for a res outside the tent, and this seems like a similar "easy" solution where at least the watering is on demand.

I've been going through old grow journals the last few days/weeks, and hope a few of you will follow along for this one. @WildBill please tag along for sure! I'll tag some others once I go back and pull their threads/names.

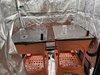
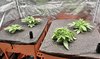
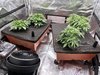
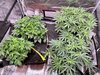
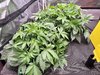
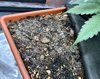
Here's where I am as of now. I used the Build a Soil Water-Only mix, wet through with Root Pack, Nutes Pack from OG Biowar/Capulator, with a bit of Dragonfly Earth Medicine's Root Zone (essentially Recharge) and mycos mixed in. About a full big bag went into each planter, with two autos in seeded in each. My biggest question at this point is when to add the dry amendments to the top. I know the soil needs some "lead time" for the nutes to become available, but am not sure how much time they need. The plan for now is to top amend in about 2-3 weeks, knowing they'll start needing more nutes around day 30 or so. I won't start filling the res for another couple weeks at least, and my lightly water in the dry amendments then, just before filling it the first time.

Am I missing anything? I'm really trying to stay true to the KISS model and not overcomplicate this one. Thanks in advance for following along!
 

Attachments

  • 796BDFD7-5D0F-42E9-BFEE-918385387B35.jpeg
    796BDFD7-5D0F-42E9-BFEE-918385387B35.jpeg
    5.6 MB · Views: 34
Those are interesting planters. If you can, I'd just take off all the stuff below the box and just have the box in the tent.When I first lokked at them, I thought I could use them outdoors. but I don't know how well the soil temps would stay in a good range.
If I used those outdoors where I am, I would cover/wrap the planter in Panda film with white side out to have the best temp control and being able still to move around. I'd also throw some bricks in the bottom shelf, or store their water there, to give it more stability. While it would be nice to have a planter you can easily move around, I would just have to pick smaller girls to grow in it outdoors. A 9ft tall girl in that would be a nightmare! LOL!
Speaking of Panda film: If where you live you have to cool the room the tent is in, I'd get some Panda film and get rid of that cover, unless it has a white side. Some of those clamp style paper clips would hold it in place fine. Your lights will heat that up.....good for winter!
Do ya have any pics of it empty and with the media separator, or a link to the planters? I want to see what the separator looks like and where the wicking areas are located.
Take a look at my current thread that's in my sig and look at how I transitioned the girls into getting 'on da rez' and when I put down my nutrient 'bank' for them.

I'm by no means a sip expert, but I'll share any info or tips I can. Just ask them here, so if anyone is searching with the same question, they can find it.
 
Thanks for the reply, @WildBill. Here’s a link to the planter.

EMSCO Easy Picker Raised Bed Grow Box – With 30" Stand, 4 Casters, and Supply Storage Grate – Self-Watering https://a.co/d/4tkFxne

The wicks are in the corners, where wet soil mix was lightly packed in. I’m hoping it’ll wick up evenly around the box like that.

Ill do another dive into your sig for a refresher. Thanks for the tips on the top and sides! I definitely plan to store heavier stuff underneath, but they’re remarkably stable out of the gate!
 
Here’s a minor update after a few days in. First things first, I screwed up the initial setup, but hopefully righted myself in time. This may turn out to be a more educational thread in how not to grow in one of these. Time will tell.

I messed up by only adding soil/mycos up to 2” from the top of the bucket. Then I needed Dolomite lime per the instructions, went out and got it, thought better and did research saying NOT to use it with cannabis, and returned to the box, where o put the wet seeds instead of adding organic ferts in the mound and topping off with soil another few inches.

So last night I removed the mulch cover (no white replacements for those are available), added the top dress in a mound and covered with soil just over the edge of the pot, recovered the mulch lid, and just now I added enough water to level it off again, hoping to fully moisten that new top layer.

Speaking of watering, I’m not a fan of the overflow dripping straight onto the bottom ledge of the stand. It’s almost impossible to catch it if you’re inside/in a tent and trying to minimize spillage. I can’t imagine flushing it inside either. Luckily I had some wide mouth planter trays handy, pictured below, to capture some overflow but any large amount of water flush would be a pain with this setup

As the plants grow and soak up this new water and the soil dries, the plan is to remove the legs and just insert casters to the pot itself before the next watering, before the plants get too unwieldy and the pots too heavy to manipulate. The stand is probably also a better fit for outdoors growing.

And finally, I had a hell of a time getting the CDLC seeds to take for some reason. One popped fine on 7/1 and is on par with the Sour Stompers, but another never broke ground, the backup came up slow and stunted out of the gate, so I just put another in right next to it, which just broke ground today. I’ll cull the weaker of the two in a week. All the seeds in this pack were tiny, smaller than most others I’ve run from them. Not sure if that had anything to do with it or if it was just luck of the draw.
Either way, onward and upward. Thanks for reading along. I’m wide open to any and all advice and criticism!
 

Attachments

  • 12FCBA63-45A8-4A4B-BFEF-370CE5E4949F.jpeg
    12FCBA63-45A8-4A4B-BFEF-370CE5E4949F.jpeg
    6.4 MB · Views: 21
  • 0990A22A-55AA-40E0-8D29-7F7D0F8F2E11.jpeg
    0990A22A-55AA-40E0-8D29-7F7D0F8F2E11.jpeg
    6.2 MB · Views: 27
  • E106F1A3-0719-4D6B-A175-91F1A3FD9FA7.jpeg
    E106F1A3-0719-4D6B-A175-91F1A3FD9FA7.jpeg
    5.6 MB · Views: 25
  • 56F82CFC-2020-4E12-BDD9-2A77F8B2B620.jpeg
    56F82CFC-2020-4E12-BDD9-2A77F8B2B620.jpeg
    4.3 MB · Views: 23
  • 532FC1DE-1CBA-4800-BEFB-996CB2D73BEA.jpeg
    532FC1DE-1CBA-4800-BEFB-996CB2D73BEA.jpeg
    5 MB · Views: 24
An update from Day 19…

The girls are coming along nicely so far. I’ve started leaf tucking and realized LST will be harder here than with the fabric pots I’m used to. Scrounging is a possibility but I think the Stomper would take over in that situation.So I may focus more on topping a couple times than LST this round.

Each bed is almost dry on the bottom so I’m prepping for a Thursday or Friday watering. I’ll hopefully take out the stands and insert the casters into the beds themselves.

As for the CDLC, the newest seed never broke its shell and then never grew once it helped it out, so it’s gone. The stunted one is still growing and getting stronger so hopefully it’ll be a good if not great producer. Both stompers are taking off. The front is a little weird at the moment because the hurricane fan got stuck blowing on it for 8 or so hours, but it’s bouncing back nicely.

I also topdressed the center sections between the plants with the Build a soil Flower Top Dress kit, and added a bit more soil. Hopefully they’ll find that in a couple weeks when the stretch starts. And this weekend they’ll get an IPM spray of OG Blowar foliar just to keep them strong and happy.

One thing I’m thinking about, I know the water in the bottom shouldn’t have “fertilizer” in it. But can I add recharge or beneficial microbes/mycorrhizae in water? Has anyone tried this or seen this? I was thinking of watering one more time, and then by the next time the res dries, add mycos and beneficial microbes to the water to stimulate the root zone in the soil.

Thanks for reading along!
 

Attachments

  • D252B7BD-7D91-45FE-8D46-56719725FFE0.jpeg
    D252B7BD-7D91-45FE-8D46-56719725FFE0.jpeg
    4.1 MB · Views: 23
I don't know if something like Recharge would work. Recharge does a little bit of nutes in it for the microbes, but I don't think it would hurt, but I just don't know.
I do add EM1 to the rez water.
I'd mix up some Recharge at a higher rate and lightly spray the top, or make a slurry with some compost and put it on top. Compost slurry would be the safest.
 
Thanks Bill. I ended up just mixing up some OG Biowar Roots (basically beneficial microbes) into a gallon and watering/soaking that in thru the tube first before topping off the res with water. I also as you mentioned added some to a spray bottle to re-wet the top dry layer of soil under the fabric. Seems to have worked pretty well. Seeing definite designs of mycelium activity via white residue on the top of the soil.

I also dropped off the legs and topped the sour stompers, and gave them their first IPM spray of OG Biowar Foliar. They are thriving so far, about to hit the stretch.

Next week’s update should be interesting! Thanks for following along!
 

Attachments

  • 918BA9D6-4E52-494A-96BA-58A81C0C1903.jpeg
    918BA9D6-4E52-494A-96BA-58A81C0C1903.jpeg
    6.1 MB · Views: 21
Thanks Bill. I ended up just mixing up some OG Biowar Roots (basically beneficial microbes) into a gallon and watering/soaking that in thru the tube first before topping off the res with water. I also as you mentioned added some to a spray bottle to re-wet the top dry layer of soil under the fabric. Seems to have worked pretty well. Seeing definite designs of mycelium activity via white residue on the top of the soil.

I also dropped off the legs and topped the sour stompers, and gave them their first IPM spray of OG Biowar Foliar. They are thriving so far, about to hit the stretch.

Next week’s update should be interesting! Thanks for following along!
I like the look of those planters without the legs. What is the depth of the planters?
 
I like the look of those planters without the legs. What is the depth of the planters?

Theyre about 10” deep. It was super easy to remove the legs and insert the casters. If this is successful I may start future seeds in a raised bed and then take down the legs before the 2nd watering.
 
Alright, back with another update on Day 33ish…

All plants continue to put on preflowers and start their stretch. I’ve defol’ed twice for light and airflow, and watered the reservoirs and sprayed with IPM. So far, so good and as you can see in the pic below, super solid indicators of beneficial bacteria and mycelium getting going, via the white markers on the top of the wet soil.

At this point, I’m just trying to keep the fungus gnats in control, adding mosquito dunks to the dechlorinated water before pouring it in, and putting up a sticky trap. They’re definitely not a major issue but something to be managed. I may spray the surface of the one bed that seems to have more with dunk water to maybe hasten the eating of the larvae by the bacteria.
Other than that minor issue, things couldn’t be going better with these planters at this point! More to come next week. Thanks as always for reading along.
 

Attachments

  • 9B20FA9E-8244-402E-A0E4-B8BE259F9C48.jpeg
    9B20FA9E-8244-402E-A0E4-B8BE259F9C48.jpeg
    5.7 MB · Views: 21
  • 621F7CD4-3399-4E1F-A491-36A6DE24B4A5.jpeg
    621F7CD4-3399-4E1F-A491-36A6DE24B4A5.jpeg
    6.5 MB · Views: 20
  • 16A9AFAF-8E10-424D-9F11-BDA19229B0DA.jpeg
    16A9AFAF-8E10-424D-9F11-BDA19229B0DA.jpeg
    5.9 MB · Views: 21
  • D13582D5-F2C1-4784-8ACF-AD21E7DB1B26.jpeg
    D13582D5-F2C1-4784-8ACF-AD21E7DB1B26.jpeg
    5.6 MB · Views: 22
Back
Top