Terra Firma
Autoflower Fanatic
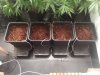
Hi everyone, I've been out of action for a while because I moved house. I built a well-insulated grow room and am now up and running.
My setup:
Space: Own design/build 1.5×1.5m gro room
Air system: Soler & Palau TD-350 Silent fan + Phresh Inline 500m³ carbon filter. Passive intake.
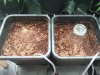
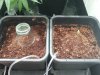
Medium: 100% Coco
Containers: 15L Autopots with Airdomes
Air Pumps: Tetratec APS 400
Recirculating water pump in tank: Sicce Syncra Nano (140-400 L/hour)
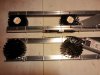
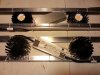
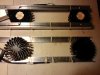
Light: 2 x DIY COB LED light with 4 CLU048 36V leds (set to 125W per light)
Nutrients: Ferro (Coco Bloom A/B, PK Booster Enriched, Bio Roots, Bio Crop, pH-), Canna (Calcium, Magnesium)
I will be growing the following:
4 x Dutch Passion Auto Critical Orange Punch
3 x Sweet Seeds Auto Cream Mandarine XL (on day 53)

Auto Critical Orange Punch is a feminized Autoflower seed variety, the first Dutch Passion auto to use Critical genetics. This auto takes around 75 days to grow from seed to harvest and is easy to grow. She thrives under 20 hours of daily light and delivers genuine XXL harvests. The genetic foundation was Grandaddy Purps x Orange Bud (and was called Orange Punch) which gave great potency and taste but yields were below average until crossed with an elite XXL Auto Kritical Bilbo. Auto Critical Orange Punch is one of our strongest varieties with very heavy yields and buds that are white with resin. Some phenotypes can take an extra week or two at the end and deliver even heavier yields than normal. She usually reaches 70-100cm indoors, with a skunky citrus aroma and a rich Afghan hash taste. The powerful euphoric high is particularly pleasant and long lasting.
My setup:
Space: Own design/build 1.5×1.5m gro room
Air system: Soler & Palau TD-350 Silent fan + Phresh Inline 500m³ carbon filter. Passive intake.
Medium: 100% Coco
Containers: 15L Autopots with Airdomes
Air Pumps: Tetratec APS 400
Recirculating water pump in tank: Sicce Syncra Nano (140-400 L/hour)
Light: 2 x DIY COB LED light with 4 CLU048 36V leds (set to 125W per light)
Nutrients: Ferro (Coco Bloom A/B, PK Booster Enriched, Bio Roots, Bio Crop, pH-), Canna (Calcium, Magnesium)
I will be growing the following:
4 x Dutch Passion Auto Critical Orange Punch
3 x Sweet Seeds Auto Cream Mandarine XL (on day 53)
Auto Critical Orange Punch is a feminized Autoflower seed variety, the first Dutch Passion auto to use Critical genetics. This auto takes around 75 days to grow from seed to harvest and is easy to grow. She thrives under 20 hours of daily light and delivers genuine XXL harvests. The genetic foundation was Grandaddy Purps x Orange Bud (and was called Orange Punch) which gave great potency and taste but yields were below average until crossed with an elite XXL Auto Kritical Bilbo. Auto Critical Orange Punch is one of our strongest varieties with very heavy yields and buds that are white with resin. Some phenotypes can take an extra week or two at the end and deliver even heavier yields than normal. She usually reaches 70-100cm indoors, with a skunky citrus aroma and a rich Afghan hash taste. The powerful euphoric high is particularly pleasant and long lasting.
Last edited: